Monday, December 31, 2012

Pomegranate Cheesecake


Source


INGREDIENTS:
Crust:
1/2 cup butter, softened
1/4 cup packed brown sugar
1 egg
1 1/4 cups all purpose flour
Filling:
4 8-oz. packages cream cheese, softened
1 1/4 cups granulated sugar
1/4 cup all purpose flour
3 eggs
1 tablespoon vanilla
1/2 cup sour cream (reduced fat worked great)
1 teaspoon finely shredded lemon peel
3/4 cup pomegranate seeds
Topping:
1 1/2 cups sour cream (again, reduced fat worked great)
1/4 cup sugar
1 teaspoon vanilla
Pomegranate Glaze:
1-16-ounce bottle pomegranate juice (usually found in the refrigerated section of juices)
1/4 cup brown sugar
1 1/2 tablespoons cornstarch
1/2 cup pomegranate seeds (tutorial on de-seeding here)
DIRECTIONS:
For the crust: preheat oven to 350 degrees. In a mixing bowl beat butter on medium high speed for 30 seconds. Add brown sugar. Beat until combined. Add egg; beat well. Beat in flour until combined. Divide dough in half. Cover one portion and set it aside.
Remove the sides from a 10-inch springform pan and set aside. Spread first portion of dough onjust the bottom of ungreased springform pan base, spreading dough to edges. Place on baking sheet. Bake for 10 minutes. Cool completely. When cool, attach sides of pan. Press chilled dough onto the sides of the sprinform pan to a height of 1-3/4 inches, using a thin metal spatula, like an offset spatula, to spread dough.
For the filling: reduce oven temperature to 325 degrees. In an extra-large mixing bowl beat cream cheese and sugar until fluffy. Beat in the flour on low speed until smooth. Add eggs and vanilla all at once, beating on low speed just until combined. Mix in sour cream and lemon peel. Then, using a wooden spoon or a spatula, gently fold in pomegranate seeds (if you use the electric mixer for this part, the seeds will burst and stain the filling with the juice – and it won’t look as pretty).
Pour filling into crust-lined pan. Place on baking sheet. Bake for 65 minutes or until edges are puffed and center jiggles slightly when gently shaken. Remove from oven. (It doesn’t matter if the cheesecake cracks on top since it will have a sour cream topping.)
For the topping: stir together sour cream, sugar, and vanilla. Spread sour cream mixture over top of baked cheesecake, spreading gently to the edges. Return to oven; bake for 10 minutes. Remove from oven. Cool on wire rack for 15 minutes. Loosen crust from sides of pan. Cool for 30 minutes more. Remove sides of pan; cool completely. Cover; chill 4 hours or overnight.
For pomegranate glaze: in a medium saucepan bring pomegranate juice to boiling; reduce heat and boil gently, uncovered, until reduced to 1 cup (12 to 15 minutes). In a separate bowl, stir together brown sugar and cornstarch. Add to juice. Cook and stir until thickened and bubbly. Cook and stir 2 minutes more. Transfer to a medium bowl; cover surface with clear plastic wrap. Cool to room temperature. Store, covered, in refrigerator until serving time.
When ready to serve, remove cheesecake and pomegranate glaze from refrigerator 15 minutes before serving. Spoon some sauce over top of cheesecake; pile remaining pomegranate seeds in center of cheesecake. To serve, slice cheesecake. Pass remaining sauce. Makes 16 servings.
NOTES: I needed a fancy-ish dessert to serve some foodie friends of mine and this was just the ticket. The crust was sublime, the cheesecake was decadent (I omitted the seeds, and only used them in the glaze), and the glaze was eye-opening. Note that the longer you refrigerate the glaze, the harder the stems of the seeds get, so I suggest keeping that at room temp before serving, if possible. 


Tuesday, December 25, 2012

Vanilla and Cinnamon Candied Nuts


Vanilla and Cinnamon Candied Nuts
2 c nuts of choice
3/4 c white sugar
1/3 c water
2 tsp vanilla**
1/4 tsp cinnamon

Preheat oven to 350F. Place nuts on cookie sheet. Toast for 10-15 minutes, shaking the pan once or twice to stir. Alternately, in a frying pan without any oil, cook nuts over medium-high heat until browned.

Combine sugar, water, vanilla and cinnamon in deep saucepan. Heat to a boil. Add toasted nuts and stir, continuing to cook until water has evaporated and nuts are coated in a sticky syrup {10 minutes over medium~high heat}. Remove from heat and spread on a cookie sheet lined with waxed paper or foil to cool.
 
You must continue to stir and cook the nuts in the sugary syrup until it is ALL gone,  just candied nuts.
This happens after about 10 minutes from adding the nuts to the boiling syrup while continuing to cook over medium~high heat, though it may take 15 minutes or more.  
The nuts will be difficult to stir because of the lack of liquid and the sticky coating, but it will not be burnt.  
REMOVE the pan from the heat before they burn once the liquid is gone, and spread them out to cool and harden.
 
 Tips and Tricks~
*Double the recipe to have some on hand for holiday guests.
*Store nuts in air tight container for snacking or tossing in a salad.
*Use different spices. Perhaps cocoa and chili powder for a spicy blend.
*Soak pan for an hour to make clean~up easy.
**If making gluten~free, make certain vanilla is gluten~free.
 
Anne-Marie made these and served them at a Christmas Party at Shawn and Ann's, they were wonderful!
 
http://aliceandthemockturtle.blogspot.com/2011/12/vanilla-and-cinnamon-candied-nuts.html

Wednesday, December 19, 2012

The Ultimate Chocolate Chip Cookie


Ingredients:
1/2 c. butter
1/2 c. high-quality tub margarine (we just use more butter)
3/4 c. white sugar
1 c. brown sugar
2 eggs
1 tsp. vanilla
3 c. flour
3/4 tsp. salt
3/4 tsp. baking soda
1 12-oz. bag chocolate chips (we only use 1/2 because we prefer the higher cookie-to-chocolate ratio)

Directions:
1. Cream together butter, margarine, sugars, eggs, and vanilla.
2. In a separate bowl, sift together flour, salt, and baking soda.
3. Add flour mixture to creamed mixture and beat well.
4. Stir in chocolate chips.
5. Bake at 350 degrees for 10-12 minutes - optional ;)

Notes: To cook or not to cook - the ultimate chocolate chip cookie question. Bret is a dough boy, I'm a baked girl. Most recipes are better in one form or the other, but not this one. It knocks the ball out of the park in both. The really is the best chocolate chip cookie recipe that I've ever tasted!

Italian Wedding Soup

Italian Wedding Soup with Spinach


Original Source, Adapted by Me

Ingredients:
1 large onion, thinly sliced
1/2 package frozen Italian meatballs
1/2 bunch celery, thinly sliced
5 cups chicken broth
2 cups water
6 cloves garlic, minced
1 tsp Italian seasoning
1/2 tsp ground black pepper
3/4 cup orzo pasta
5 cups shredded fresh spinach
grated parmesan cheese (optional)

Directions:
1. Combine onion, meatballs, celery, broth, water, garlic, Italian seasoning, and pepper in a large crockpot. Cook on high 4-5 hours.
2. For last 20-30 minutes of cooking time, add orzo.
3. Stir in spinach and sprinkle with parmesan cheese just before serving.

Notes: Years ago I ate a bowl of "Italian Wedding Soup" that Aunt Kathleen made and I fell in love with the dish. Since I don't see her very often, I felt uncomfortable asking for the recipe after the fact, so I've been on the hunt for a similar dish since then. As it turns out, that title is a a very loose one and refers to just about any type of soup with Italian-ish seasonings. It has been so long since I have eaten Kathleen's that I can't remember the ingredients that she used, but when I found this recipe, it seemed like it would be a similar result. After making and tasting it, I don't think that it's the same, but it sure is delicious! Simple and mild enough to be a "sick soup," yet flavorful enough to be an enticing winter comfort food. This has been officially added to our go-to meal list.

Monday, December 10, 2012

Snickerdoodles

Source: my mom's recipe box - I'm not sure where it originally came from (maybe a Family Fun magazine?)


Ingredients:
2 2/3 cups flour
1 ½ tsp. cream of tartar
1 tsp. baking soda
1/4 or less tsp. salt
½ cup butter
½ cup shortening (I'm sure you could substitute this for butter if you're not a shortening-eater)
1 ½ cups sugar
2 large eggs

Directions:
Preheat oven to 400°.  Mix shortening, butter, sugar and eggs.  Add soda, salt and cream of tartar.  Mix together well.  Add flour 1/3 cup at a time.  Roll into small balls (about the size of a shooter marble - like an inch in diameter).  Roll in cinnamon sugar.  Flatten slightly with bottom of a glass.  Bake for about 7-10 minutes (but watch them - you don't want them to really be brown, just barely golden at the edges).  Makes over 60 cookies.

Notes:
Last night I got the hankering for something sweet and I had just bought some cream of tartar this weekend with the hopes of using it for snickerdoodles sometime soon.  Turns out, a chilly Sunday evening in December is a perfect time to make snickerdoodles.  We inhaled these warm out of the oven with a mug of milk.  Mmmm-hmmm.  So delish!  Why do I only ever make snickerdoodles around Christmastime?  Hmm.

Wednesday, December 5, 2012

Quinoa Hoppin' Johnny

Source: Inspired by a dish at Firefly Fare in Roanoke, VA

Ingredients:
1.5 cups dry quinoa [keen-wa], prepared (I used this method, with broth; easy, quick, and turned out great)
1 can Great Northern Beans, warmed
1 cucumber, diced
2 tomatoes, diced
Olive oil
Salt
Pepper

Directions:
Mix cucumber and tomoatoes in a bowl. Drizzle with olive oil and add salt and pepper to taste. Top quinoa with beans and then add the cucumber and tomato mixture on top.

Notes: Ryan and I got to go on a dinner date to Roanoke and when we were walking around downtown trying to decide where to eat, we grabbed a quick Quinoa Hoppin' Johnny at Firefly Fare in the Market Square. I asked them what a Hoppin' Johnny was and the server replied by asking me if I knew what quinoa was. I proudly answered yes, but she never really explained what a Hoppin' Johnny was. Thanks to a little internet research, I now know it is a dish created in SC traditionally eaten with collard greens and cornbread on New Year's for good luck (I knew collard greens were eaten that day, but had never heard about this dish). The original recipe uses rice, red beans, and bacon, so obviously this version is a big twist on that. It is delicious, filling, extremely filling, and best of all, does not contain wheat, egg, milk, peanuts, or tree nuts!

Wednesday, November 28, 2012

Pumpkin Spice Rolls

Source: The Sisters Cafe

Ingredients:
4 teaspoons active dry yeast, or approximately 2 envelopes
1/4 cup milk
about 5 1/4 cups all-purpose flour
1 1/2 teaspoons cinnamon
1  teaspoon ground ginger
1/4 teaspoon ground cloves
1/4 teaspoon ground cardamom (I didn't have any so I left it out)
1/3 cup brown sugar
1 1/2 teaspoons salt
2 large eggs
1/4 cup melted butter
1 3/4 cup pumpkin puree, or a 15 oz can of pure pumpkin
egg wash (1 egg lightly beaten with 1 Tablespoon of water)

Directions:
Heat milk to between 110 and 115 degrees (feels slightly warm on the back of your hand) on the stove or in the microwave and pour into the bowl of your stand mixer (I don't have a stand mixer, so I just used a large mixing bowl); stir in the active dry yeast, and let stand for at least 5 minutes.  Meanwhile, in a large bowl, combine the dry ingredients (flour, spices, sugar, and salt - I only added about 3 cups flour to this mix, then added the rest bit by bit as I stirred and kneaded, so it wouldn't become too dry), and mix well.  In a separate large bowl, lightly beat the two eggs, then stir in the melted butter and the pumpkin puree.  After the yeast has been activated, add the wet ingredients directly into the bowl of your stand mixer, and stir to combine. Then add 1/2 of the dry ingredients from the other large bowl, and stir to mix the dry and wet ingredients together.  After it is well mixed, add the remaining 1/2 of the dry ingredients and mix again.  Using the dough hook, allow your machine to knead the dough for you until it is smooth and still somewhat sticky (3-5 minutes) (or just do it by hand - it's relaxing!).

Transfer the dough to a lightly oiled bowl, and cover to let rise for approximately 1 hour (it will double in size).  Then, remove the dough from the bowl, place it on a lightly floured surface.  Lightly grease a bar pan cookie sheet.  Cut or pinch off 18-24 evenly sized portions (depending on how big you want them) and roll them into balls that can fit into your palm (they don’t need to be perfectly round).  Space them in the pan so they are just barely touching the sides of one another; they will expand during the second rising time and during baking to completely fill the pan.

After your dough is shaped, cover it loosely with a towel, and let it rise for another 1-1 1/2 hours.  Meanwhile, preheat your oven to 350 F.  Once your bread is ready to bake, brush the top lightly with the egg wash, and sprinkle dinner rolls with chopped nuts or pepitas if desired.  Bake bread for approximately 30-35 minutes (mine took less - more like 25 minutes), until browned, or until an instant read thermometer inserted in center reads 190 degrees. Remove the bread from the oven and allow to cool on a rack.

Makes 18-24 rolls.

Notes:
I had seen this recipe on The Sisters Cafe blog around Thanksgiving time and thought it looked intriguing.  When we decided to have book group at my house this month, and one of the girls offered to bring soup, I knew I had to try them out.  As they were cooking the house smelled amazing - like pumpkin pie and gingersnaps.  I admit I was a little worried that these rolls would turn out more like dessert than a dinner roll, but when we ate them, the spice and pumpkin flavors were very subtle, even though the scent was strong.  They were very fluffy and soft and delicious, and everyone loved them.

Tuesday, November 20, 2012

Homemade Cranberry Sauce

Source: epicurious.com

Ingredients:
1 cup water
1 cup sugar
12-oz bag fresh or frozen cranberries (3 cups)
1/2 teaspoon freshly grated orange zest (I didn't have any oranges, but I did have some Cutie mandarins - one little Cutie gave a little more than 1/2 teaspoon of zest - perfect!)

Directions:
Bring water and sugar to a boil, stirring until sugar is dissolved. Add cranberries and simmer, stirring occasionally, until berries just pop, 10 to 12 minutes.  (I kind of mashed some of mine with the back of the spoon, to make it a little more mushy.) Stir in zest, then cool.  Can be made three days ahead and chilled, covered.

Notes:
I was also in charge of cranberry sauce for the Blanchards this year.  I was feeling ambitious, and rather than copping out with the canned stuff (which I'm not necessarily opposed to, just fyi), I remembered my mom making some homemade kind years ago and decided to give it a whirl.  There are no can lines, and it's definitely runnier than the gelled stuff, but I think it tastes pretty good.  Again, hope the fam agrees.  (Or maybe I won't be assigned Thanksgiving foods in the future!)  :)

Green Bean Casserole (from scratch and make-ahead-able)

Source: Mel's Kitchen Cafe

Ingredients:
for the topping:
2 slices hearty sandwich bread, white or wheat, torn into pieces
2 tablespoons unsalted butter, melted (mine was salted so I just left out the salt)
1/4 teaspoon salt
2 cups canned fried onions

for the casserole:
3 tablespoons unsalted butter (mine was salted so I just reduced the salt)
10 ounces white mushrooms, sliced thin
1 teaspoon salt
1/2 teaspoon pepper
6 garlic cloves, minced
1/2 teaspoon dried thyme
1/4 cup all-purpose flour
1 3/4 cups low-sodium chicken broth
1 1/2 cups heavy cream
2 pounds fresh green beans, trimmed and cut into 1-inch pieces (I used two 12 oz packages, so it was only 1.5 lbs - I think this gave it a little bit saucier consistency than if there were more beans, and we like sauce, so it was perfect.)
1/4 cup cornstarch

Directions:
For the topping: Pulse bread, butter, and salt in food processor until coarsely ground.  (I don't have a food processor, so I tried my blender - which I was kinda scared to do, because it's not exactly the best blender in the whole world - I toasted the bread first, then ripped it into pieces and poured the butter over it.  Worked like a charm.) Combine bread mixture and canned fried onions in a bowl, transfer to a zipper-lock freezer bag, and freeze.

For the casserole: Melt the butter in a large 12-inch skillet (I used a large sauce pan) over medium heat. Add the mushrooms, salt, and pepper and cook until the mushrooms release their liquid, about 5 minutes. Increase the heat to medium-high and cook until all the liquid has evaporated, about 5 minutes. Add the garlic and thyme and cook until fragrant, about 30 seconds. Stir in the flour and cook until golden, stirring, about 1 minute. Slowly whisk in broth and cream and bring the mixture to a boil. Reduce the heat to medium and simmer, stirring occasionally, until the sauce has thickened, about 10 minutes.

In a large bowl, toss the green beans with the cornstarch until the beans are evenly coated. Transfer the beans to a 9x13-inch baking dish. Pour the warm mushroom mixture evenly over the beans. Let the casserole cool completely on the counter. Once cooled, cover with a layer of plastic wrap and then a layer of foil. Freeze for up to 2 months.  (I didn't need to freeze it for 2 months, though that is a handy thing to know - mine was frozen for just a couple of days, then it made the journey to Utah in the cooler.)

When ready to bake, adjust oven rack to the middle position and heat the oven to 400 degrees. Remove the layer of plastic wrap from the baking dish and replace the foil. Bake, covered, until the sauce is bubbling and the beans are tender, about 80 minutes, stirring the beans thoroughly after 50 minutes. Remove the foil and spread the frozen topping mixture over the beans. Bake until golden brown, about 8-10 minutes. Serve.

Notes:
I got assigned the "vegetable" for the Blanchard Family Thanksgiving Dinner this year.  I have only been in the family for a couple of Thanksgivings, so I didn't know if there was some sort of traditional vegetable dish that I should make.  I was informed that there wasn't - that I had free reign to find something fabulous - so of course, I turned to Mel's blog, which is my favorite.  Haven't tasted it yet (well, I did taste the sauce and it was pretty dang good), but it looked delicious when I put it in the freezer last night.  Hope the rest of the fam agrees.  :)

Monday, November 19, 2012

Drop Sugar Cookies


Ingredients:
2 cups all purpose flour, sifted
2 teaspoons baking powder
1/2 teaspoon salt
2 large eggs
3/4 cup sugar plus additional sugar for topping
2/3 cup vegetable oil
2 teaspoons vanilla
1 teaspoon grated lemon zest

Sift flour, baking powder and salt into a medium bowl, and mix well
Whisk eggs in large bowl until blended.  Add sugar, oil, vanilla and zest and mix well.
Stir the dry ingredients into egg mixture until blended.
Chill, covered for 30 minutes or longer

Drop cookie dough by rounded teaspoonfuls onto ungreased baking sheets (I rolled them into balls before pressing)

Oil the bottom of a flat bottom glass and dip glass into additional sugar
Press the top of each cookie lightly with the glass to flatten slightly
Dip in sugar before pressing each cookie
Bake cookies until lightly browned about 8 minutes
(I baked them for @ 11 minutes at 375)
cool on wire racks
makes about 16 cookies.

 
When I was growing up my mom used to make these sugar cookies that had oil  instead of butter or shortening, and over the years we lost the recipe.  Well I found it and made it last week.  I took some to mom and reminded her of the times thata she would make a whole tupperward full before we left for a trip.  We didn't have many desserts in those days, so a whole container of cookies and a trip was so exciting! They turned out yummy and everyone loved them! The top photo is from the recipe card and the bottom ones were mine.

Thursday, November 15, 2012

Crockpot Ranch Potatoes

Source: adapted from this blog, via Pinterest

Ingredients:
2 lbs red potatoes, cut into bite sized pieces (no need to peel 'em unless you really hate peels)
1 (10.5 oz) can cream of chicken soup
1 cup sour cream
1 ranch packet (I didn't have one, so I used this: 1 Tablespoon dried parsley, 1/2 teaspoon dried dill weed, 1/2 teaspoon garlic powder, 1/2 teaspoon onion powder, 1/4 teaspoon dried basil and 1/4 (a little less, actually) teaspoon black pepper, which I found here)
1 Tablespoon lemon juice (I added this because of another ranch dressing recipe that I found and I just thought it might be good)
~1 cup cubed ham (you could certainly add more or none at all, but I had this much left over from some other meals, and I decided to toss it in)

Directions:
Put potatoes and ham into a crockpot.  In a separate bowl mix together the soup, sour cream, lemon juice and seasonings.  Pour the goop over the potatoes and give everything a good stir to coat.  Put the lid on your pot and cook on low for about 4-6 hours or high for 2-3 hours (you'll really just have to go by how your slow cooker cooks - mine always seems to take about half the time that recipes say it should to cook things).  When your potatoes are soft, they're done.  Eat up!

Notes:
My friend Marcy pinned this today and it sparked a memory of a forgotten bag of potatoes that I had in my cupboard.  Luckily they weren't too old or wrinkly, so I decided to use them for dinner.  I added the ham to make it more of a one-pot-sort-of-meal, but if you have some other main dish you'd like to eat, I'm sure these would make a great side, too.  We loved them!  Really creamy and just a lovely comfort food.  Next time I'm going to add carrots and big chunks of onion - I think it would be great!

Friday, November 9, 2012

Pumpkin Cheesecake Bars

Source: adapted from myrecipes.com


Ingredients:
for the crust:
20 oreos (I actually used 1 sleeve of chocolate grahams - made about 1 1/2 cups of crumbs)
2 1/2 Tablespoons unsalted butter, melted (whoops - my had salt - no biggie!)

for the filling:
2 8-oz packages cream cheese, at room temperature
1 cup sugar
1 cup canned pumpkin puree
3 large eggs, at room temperature (whoops - forgot to take those out when I took out the cream cheese - no biggie!)
1 teaspoon vanilla extract
3 Tablespoons all-purpose flour
1 teaspoon pumpkin pie spice (I didn't have any so I used a concoction of what I did have: 1/2 teaspoon cinnamon + 1/4 teaspoon ground ginger + 1/8 teaspoon nutmeg + 1/8 teaspoon cloves.  Adapted from this recipe with what I had.)
1/4 teaspoon salt

Directions:

1. Preheat oven to 350ºF. Line an 8-inch-square pan with foil so that foil overhangs sides. Mist with cooking spray. (I did the lining an 8x8 pan and misting with cooking spray step - and then when I had the crust baked and done and ready for the filling to be poured in I realized there was NO WAY all that filling was going to fit in my pan.  So I dumped the crumbs into a 9x13 (un-lined and un-sprayed), patted them down gently, and poured away.  Worked fine.  And fit like a glove.)
2. Make crust: Process cookies in food processor until ground. Pulse in butter. Press evenly into pan. Bake until firm, 10 to 12 minutes. Cool slightly.
3. Make filling: With an electric mixer on medium speed, beat cream cheese and sugar until smooth, about 2 minutes. Beat in pumpkin, then eggs, 1 at a time. Beat in vanilla, flour, spice and salt until just combined.
4. Pour mixture into pan. Put pan on a large rimmed baking sheet; place in oven. Pour hot water into baking sheet until it's nearly filled. Bake until cheesecake is set around edges but jiggles slightly in center, 40 to 45 minutes. Remove pan from sheet; cool completely on rack. Cover with plastic wrap. Chill until firm, at least 3 hours.

Notes:
Gregg has been (not so) subtly hinting at how much he has been wishing for cheesecake lately, so when we were at the store this week, we grabbed some cream cheese (not usually on our list) with the intention of making these.  We also needed to grab nutella in order to make that recipe, but after suffering from the sticker shock for said ingredient, we put it back on the shelf and decided to try something else.  (We're really cheap.)  I got looking at my pinterest cookbook board and discovered a plethora of cheesecake recipes, many involving pumpkin, which is something I had on hand as well as something that fits in with the lovely season we're in right now.  So it was settled.  And I got busy baking.  Gregg was out of town yesterday for a conference, so he didn't get home till much later than usual, but luckily it was just enough time for the 3 hour cooling of these bars to be complete.  Perfect timing for a perfect surprise.

And so delicious!  They taste just like pumpkin pie in a light and fluffy cheesecake form.  I liked the chocolate from the grahams in the crust, but I think they'd be equally delicious with a gingersnap crust - I'll try that next time.  Now our only problem is finishing off a huge pan of cheesecake by ourselves - anyone want to visit?  :)

Monday, November 5, 2012

No-Bake Energy Bites


Source

Makes 18-20 bites

Ingredients:
1 cup oatmeal
1/2 cup peanut butter
1/3 cup honey
1 cup coconut flakes (I'm not the biggest fan of coconut, but it isn't the same without it, so I reduce the amount and chop mine VERY finely)
1/2 cup ground flaxseed
1/2 mini chocolate chips (I like to use craisins and chopped nuts)
1 tsp vanilla

Directions:
Mix all ingredients in a medium bowl until thoroughly incorporated. Let chill in the refrigerator for about 30 minutes. Once chilled, roll into balls and enjoy. Store in an airtight container and keep refrigerated for up to 1 week.

Notes:
I love breakfast food, but I hate eating breakfast. I can't eat most convenience foods, and I hate interrupting my morning (my most productive time) by wasting my energy on cooking. Dilemma. I recently discovered this recipe and now, instead of skipping the meal, do my metabolism by a favor by popping one or two of these in my mouth. Problem solved! Not only for the morning, but any time I feel the need for "a little something" to boost my energy or curb my appetite. Melia and Bret love them too! I hope to find a similar recipe that has a little less fat and sugar, but in the meantime, this is great!

Sunday, October 21, 2012

Nutella Hot Chocolate

SourceThe Hungry Housewife via Pinterest
 

Ingredients:
  • 1 cup milk
  • 2 1/2 Tbsp Nutella
  • 1 Tbsp Cocoa
  • Tiny pinch of salt
Directions:
  1. In a small sauce pan over medium heat, whisk all ingredients together until well blended and hot.
  2. Pour in a cup and top with homemade whipped cream and shaved chocolate.
Comments:

Nutella. Hot. Chocolate.  Need I say more?  Seriously, chocolate + hazelnut is one of the best combinations ever conceived.  This stuff was quick, easy, and diiiivvvvine.  I'm so happy fall is here, and it's the season for soups, casseroles, pumpkin baked goods, and hot chocolate.  Ahhhhh.

Thursday, October 4, 2012

Butternut Squash Soup

Source: Allrecipes.com
  • PREP 15 mins
  • COOK 45 mins
  • READY IN 1 hr
 Ingredients:
  • 2 Tbs butter
  • 1 small onion, chopped
  • 1 stalk celery, chopped
  • 1 medium carrot, chopped
  • 2 medium potatoes, cubed
  • 1 medium butternut squash---peeled, seeded, and cubed
  • 32 oz chicken stock
  • salt and pepper to taste
  • I added rosemary, which went beautifully with the soup

Directions:

  1. Melt the butter in a large pot, and cook the onion, celery, carrot, potatoes, and squash 5 minutes, or until lightly browned. Pour in enough of the chicken stock to cover vegetables. Bring to a boil. Reduce heat to low, cover pot, and simmer 40 minutes, or until all vegetables are tender.
  2. Transfer the soup to a blender, and blend until smooth. Return to pot, and mix in any remaining stock to attain desired consistency. Season with salt and pepper.
 
Notes: Fast, easy, cheap, healthy, and delicious. Nothing more to say!

Tuesday, August 21, 2012

Cheesy Flatbread

Source: About.com Dairy Free Cooking

Prep Time: 15 minutes
Cook Time: 15 minutes
Total Time: 30 minutes

Ingredients:
  • 3 cups all-purpose flour
  • 1/3 cup nutritional yeast
  • 2 t. baking powder
  • pinch of baking soda
  • 1 ½ t. salt
  • ½ t. garlic powder
  • 2 T. cold dairy-free vegetable shortening or soy margarine (I used the Earth Balance buttery spread made from 5 plant-based oils that we keep in the house for me and Katie)
  • 1 T. tahini (I didn't have any, so I omitted)
  • 1 1/3 cup cold water
Preparation:
1. In a medium-sized mixing bowl, sift together the flour, nutritional yeast, baking powder, baking soda, salt, garlic powder and pepper. Using a pastry blender or fork, cut in the shortening or margarine and tahini until the mixture resembles fine crumbs. Using a wooden spoon, mixed in the water until forming a soft dough. (Do not over-mix.)
2. On a lightly floured work surface, divide the dough into 4 equal parts. Roll out each piece so that it is about 6-8 inches in diameter, and prick the surface of the dough with a fork.
2. Heat a lightly oiled heavy-bottomed skillet over medium heat, and cook one flat bread circle at a time, flipping when golden brown and cooking the opposite side until cooked through and golden. Transfer the flatbread to a covered plate while repeating with the remaining dough. Serve warm.

Notes:
I was going to make pita bread (I'll try to get that recipe up soon) for our dahl meal, but even though that recipe was quick, I was hoping to find something even quicker and more like naan. I was excited by how fast this recipe was (no rise time) and the fact that it uses nutritional yeast, which I've just started using. Nutritional yeast is yeast that is chock full of B vitamins. You can get it in bulk at natural food stores (also in little shakers, but cheaper in bulk). It's like little flakes, kind of looks like fish food, I guess. It tastes salt (but has no salt in it) and cheesy, which is great if you're on a low-salt, dairy-free diet (that would be me). You can add it to any food as a seasoning. This bread was so quick and easy and tasted SO good. It was a hit with everyone. I will definitely be making this regularly. Oh, and I've learned from my Indian friends that bread like this does not keep well. We did have a little leftover that I put in the fridge and will probably eat tomorrow, but I'm expecting it to be pretty dry.


Dahl

Source: About.com Dairy Free Cooking

Prep Time: 10 minutes
Cook Time: 35 minutes
Total Time: 45 minutes

Ingredients:
  • 1 T. sesame oil or, alternatively, olive oil (I used olive)
  • 1 cup finely chopped white onion
  • 2 cloves garlic, finely chopped (I used garlic powder because out of fresh)
  • 1 T. finely chopped fresh ginger (I used powder)
  • 4 cups water or vegetable broth (I used vegetable broth)
  • 1 cup dried red lentils, rinsed and picked over
  • 1 t. cumin
  • 1 t. coriander (I used curry seasoning because the first ingredient is coriander and I didn't have any plain)
  • 1 t. tumeric
  • ¼ t. cardamom (didn't have; omitted)
  • ¼ t. cinnamon
  • ¼ t. cayenne pepper (I thought I didn't have cayenne---I do---so I used paprika instead)
  • 1 t. salt, or to taste
  • 2 T. tomato paste
 Directions:
1. In a 3-quart stockpot or other medium-sized soup pot, heat the sesame oil over medium heat. Once the oil is hot, add the onion, garlic and ginger. Cook, stirring often, until the onions are translucent, about 6 minutes.
2. Stirring constantly, add the water or broth, lentils, spices and salt. Bring to a low boil, then turn down the heat to low, cover and let the soup simmer for about 20 minutes, or until lentils are very tender.
3. Stir in the tomato paste until well combined. Cook several minutes more, or until the soup is desired temperature and consistency, adding more water to the dahl if needed. Serve hot with Dairy-free Cheesy Flatbread and garnish with a dollop of dairy-free soy yogurt if desired.

Notes:
When we lived in NY I was friends with two neighbors from India and they made me and Ryan some of the most amazing meals we've had in our life. I will never forgive myself for not having them teach me more (I did start using a pressure cooker because of one friend) while I had the opportunity. Anyway, I finally decided to go for it with red lentils when I found them at a natural food store I just went to for the first time. This soup was incredibly easy and turned out nice and thick and actually pretty mild. Perfect comfort food. Next time I might kick it up a notch with the spices though. Normally Dahl is made with Ghee (clarified butter = yummy fat) instead of broth, but I don't have any and won't in the near future since I'm off dairy (for a few reasons, mostly because I'm nursing E and there is some concern about allergy because she's started getting eczema). Anyway, I will definitely be keeping this in my repertoire.

Saturday, August 18, 2012

Oatmeal Raisin Yogurt Muffins

Source: The seal from my Dannon Vanilla Yogurt container

Ingredients:
1 cup all purpose flour
1 cup old fashioned rolled oats (I accidentally added 1/2 cup quick oats before I realized I should have used the other ones - so my batch was half and half and it worked perfectly fine)
1/2 cup firmly packed brown sugar
1 1/2 teaspooons baking powder
1/2 teaspoon salt
1/4 teaspoon cinnamon (I probably did closer to 1/2 teaspoon - I like cinnamon)
1/2 cup raisins, plumped (just cover 'em in really hot tap water and let 'em soak for about 5 minutes, then drain the water and you have nice plump raisins)
1 cup yogurt (I used vanilla, the recipe also suggests strawberry as an option)
1 large egg, beaten lightly
2 Tablespoons canola oil

Directions:
Preheat the oven to 375 degrees F.

Lightly grease 1/2 cup muffin tins or use paper liners.  In a medium bowl stir together flour, oats, brown sugar, baking powder, salt, cinnamon and raisins.  In a small bowl whisk together yogurt, egg and oil.

Stir the yogurt mixture into the flour mixture and mix the batter until it is just combined.

Divide the batter among 10 cavities and bake the muffins on the middle oven rack for 22-25 minutes (mine were done at 20 minutes exactly).

Notes:
Yep - back on the muffin train!  I noticed this recipe when I opened a container of yogurt recently and I rinsed and saved the lid just so I could try them out.  The house smelled amazing as they were cooking - not unlike when we make oatmeal raisin cookies.  And the muffins themselves were quite delicious.  I personally liked them warm better than room temp, so after they had cooled, I nuked mine in the microwave for a few seconds.  Love that warm raisin flavor!

Creamy Enchilada Casserole

Source: adapted from Slow-Cooker Cookbook by Debbie G. Harmon, a gift from my Grandma Elwood

Ingredients:
1 lb ground beef
1 onion, chopped
1 clove garlic, minced
15 corn tortillas
1 can cream of mushroom soup
1 cup milk
2 cups cheese, grated
1 large can enchilada sauce (I used this homemade version because I didn't have the canned stuff on hand)
sour cream, lettuce, tomatoes, salsa for toppings

Directions:
Brown meat with salt and pepper to taste.  Drain.  Mix with onions and garlic.  In a small bowl mix cream o' mushroom soup with milk.  In slow-cooker, layer tortillas (I did five per layer, kind of overlapping each other and folding up the side slightly), soup-milk mixture, ground beef, 1/2 cup cheese, and enchilada sauce.  Repeat for 3 layers total.  Top with remaining cheese.  Cover and cook on high 3-4 hours (I find my slow-cooker to be on the hotter side, so our casserole was done closer to 2) or low 6-8 hours.  Serve with sour cream, lettuce, diced tomatoes and salsa.

Notes:
I had some leftover corn tortillas that I was wondering how to use up, and it was a hot day that I didn't really feel like turning on the oven for, when I remembered this book from my grandma and peeked inside to see if there were any good ideas floating around there.  Bingo!  Just what I needed.  This recipe reminded me quite a bit of a similar Dutch oven enchilada recipe that I grew up making at home.  But I liked the twist of the corn tortillas in this one.  I admit I had my doubts that it would turn out okay since I was using the homemade enchilada sauce that tasted weird by itself, and when it was cooked it really did not look that pretty (hence no picture), but Gregg gobbled it right up.  In fact, he kind of raved about it.  It's just his kind of food - good flavor and all mushed together.  :)

Sunday, August 12, 2012

Banana-Oat Muffins

Banana Oat Muffins Recipe


Source (altered by me, based on suggestions made in the comments on the original recipe)

Ingredients:
1 1/2 cups flour (I used whole white wheat, sifted)
1 cup rolled oats
1/4 cup white sugar
1/4 cup brown sugar
2 teaspoons baking powder
1 teaspoon baking soda
1/2 teaspoon salt
1 egg
3/4 cup milk
1/3 cup unsweetened applesauce
1/2 teaspoon vanilla extract
1 cup mashed bananas (I used 2 med-lg bananas)

Directions:
1. Combine flour, oats, sugar, baking powder, soda, and salt.
2. In a large bowl, beat the egg lightly. Stir in the milk, applesauce, and vanilla. Add the mashed banana, and combine thoroughly.
3. Stir in the flour mixture into the banana mixture until just combined. Stir in additions, if desired (chocolate chips, nuts, etc.)
4. Line a 12-cup muffin tin with paper baking cups, and divide batter among them. Bake at 400 degrees F for 18-20 minutes.

Notes: After not using a bunch of bananas during our camping trip last week, then getting a new bunch in our Bountiful Basket yesterday, we're scrambling to use up the yellow fruit before they all turn too ripe. I wanted a healthy muffin recipe for breakfast this morning and found this after a quick google search. What a lucky find! Easy to whip up, not too sweet (like banana bread), and very healthy and hearty. Upon the request of my sweet-toothed husband, I added some chocolate chips (which was delicious!), but if I had my way, I would have added nuts instead.

Wednesday, August 8, 2012

Crispy Southwest Chicken Wraps

Source: Mel's Kitchen Cafe

Ingredients:
1 cup cooked rice, warm or at room temperature
1 cup cooked, shredded chicken (or other leftover meat, like shredded pork or beef)
1 can black beans, rinsed and drained
1 green onion, finely sliced (white and green parts) (I didn't have a green onion, so I just used a little bit of regular yellow onion - not too much, and finely diced)
1/2 red or green pepper, diced
1/4 cup fresh cilantro, chopped
juice of 1 lime
1/2 tablespoon chili powder
1 teaspoon ground cumin
1/2 teaspoon garlic salt
2 cups shredded cheese
Sour cream (optional)
6 burrito-sized flour tortillas

Directions:
Mix rice together with chili powder, cumin and garlic salt. Add remaining ingredients except for cheese and sour cream. Sprinkle cheese over tortillas, leaving 1/2-inch border around edges, then arrange chicken and rice mixture down the center of each tortilla. Dollop little bits of sour cream over the cheese before arranging chicken and rice mixture down the center – it makes the wraps delightfully creamy.  (Mel says that sour cream step is optional, but I wouldn't leave it out!) Roll stuffed tortillas (more like fold it in thirds - see this post for details on how I did it), leaving edges open and slightly flatten the wraps with the palm of your hand. Spray seam-side of the wrap lightly with cooking spray.

Heat a large non-stick skillet (or griddle) over medium heat for 1 minute. Arrange wraps, seam-side down, in pan or griddle and cook until golden brown and crisp, about 2-3 minutes per side. Cooking them seam-side down first helps seal the long edge so they don’t fall apart. Transfer to a plate and repeat with remaining wraps. Serve warm.

Notes:
I knew this would be a good one, and it didn't disappoint.  :)  I especially loved the zing the lime juice gave to everything.  Really yummy and really filling and really quick to pull together.  Win, win, win.

Friday, July 27, 2012

White Bean Guacamole

Source: Tasty Kitchen

Ingredients:
1 can (15 oz. size) white Cannellini beans, drained and rinsed (I just used 2 cups of my cooked and frozen Great White Beans - but I'm guessing the canned kind might be easier to mash)
1 Tablespoon freshly squeezed lime juice (I used a whole limes worth - because what else was I going to do with the rest of the lime juice?)
¼ cup red onion, chopped (didn't have a red one - so just used a white one)
½ cup fresh cilantro leaves
1 teaspoon salt
1 whole jalapeño, seeded and diced
1 whole avocado, halved and pitted (I had one that I had frozen a few months ago - worked like a charm)
1-½ whole Campari tomatoes, seeded and coarsely chopped (I don't even know what a Campari tomato is, but I had a Roma and that's what I used.)

Directions:
In a food processor, add the beans and lime juice and pulse to combine. Transfer to a bowl. Next add the onion, cilantro leaves, salt and jalapeño to the processor and pulse until thick and creamy.

Add the avocado to the bean mixture and mash a bit to combine. Keep some of it chunky for added texture.

Seed and coarsely chop the tomato and add to the bean-avocado mixture and stir to combine. Add the onion-cilantro mixture and stir it all to combine. You may need to add a little more lime to ensure the avocado does not turn brown.

Serve right away or refrigerate for up to 1 hour.

Serves 6.

Notes:
I saw this one day and pinned it because it just seemed really unique and I liked the idea of making the avocado go further by mixing it with healthy beans (not that avocado isn't healthy, just they're super expensive here, so I like to spread out the wealth).

I attempted to use my blender for the food processor steps and it wasn't super successful - maybe my blender is just wussy, but I'd suggest following the recipe and using the food processor if you have one.  If not, a potato masher or even a spoon and a lot of elbow grease (thanks, Kim!) will do the trick - maybe not as smooth as a machine could have done it, but I think it worked.

We had this on our sweet potato tacos and it was really delicious!

Tuesday, July 17, 2012

Garlic Lime Chicken Fajitas

SourceMcCormick Recipe Inspirations


Servings: 8
Prep Time: 15 minutes
Refrigerate Time: 30 minutes
Cook Time: 10 minutes

Ingredients:
  • 1 t. minced garlic
  • 1 t. minced onion (dry)
  • 3/4 t. cumin
  • 3/4 t. oregano
  • 1/2 t. cilantro (dry. . .but fresh would probably be great!)
  • 1/2 t. black pepper
  • 1/4 cup each lime and orange juices
  • 2 tablespoons olive oil
  • 1/2 teaspoon salt
  • 1 1/2 pounds boneless skinless chicken breasts, cut into thin strips
  • 1 medium green or red bell pepper, cut into thin strips
  • 1 medium onion, thinly sliced
  • 8 flour tortillas (8-inch)

Directions:
  1. Mix juices, oil, all of the Spices and salt in small bowl. Reserve 1/4 cup of the marinade. Place chicken in large resealable plastic bag or glass dish. Add remaining marinade; turn to coat well. Refrigerate 30 minutes or longer for extra flavor.
  2. Cook and stir chicken in large heated skillet on medium-high heat 3 minutes or until lightly browned. Remove from skillet. Add bell pepper, onion and reserved marinade; cook and stir 5 minutes or until tender. Return chicken to skillet. Cook 2 to 3 minutes or until heated through.
  3. Spoon chicken mixture into warm tortillas. Serve with assorted toppings, if desired.

Comments:

These were amazing fajitas!  Much different flavor than the usual ones we make with fajita seasoning packets; very citrusy with the lime and orange juices, and the spice combination was great!  Like the rosemary chicken recipe I posted a couple months ago, I found this recipe on the back of one of those McCormick pre-measured packets of spices. . .just wanted to make sure to document it so we can make these again without having to buy the packet!

Monday, July 16, 2012

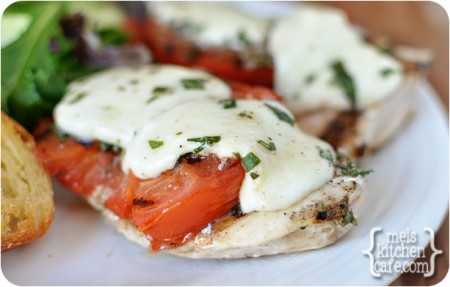
Grilled Caprese Chcken


Source


Ingredients:
4 tablespoons chopped fresh basil (I forgot to pick some up while grocery shopping so I omitted the garlic and substituted pesto - delicious!) 
2 tablespoons red wine vinegar
2 garlic cloves, minced
Salt and pepper
4 tablespoons olive oil
6 ounces fresh mozzarella, cut into 1/8"-1/4" slices, halved, and patted dry
4 chicken breasts
2 large tomatoes, cored, and cut into 1/2" slices

Directions:
1. In a small bowl, combine the basil, vinegar, garlic, 1/2 teaspoon salt, and 1/2 teaspoon pepper. Slowly whisk in the oil until it is thoroughly incorporated. Transfer 3 tablespoons of the vinaigrette to a bowl and toss in the fresh mozzarella pieces, coating the cheese with the vinaigrette. Set aside. Reserve the remaining vinaigrette for the cooked chicken.
2. Pat the chicken pieces dry with a paper towel and season both sides with salt and pepper. Grill the chicken and tomatoes on a hot charcoal or gas grill until the chicken is browned and cooked through and the tomatoes are lightly charred, about 2-3 minutes per side (depending on the thickness of your chicken and the heat of the grill). Transfer the cooked chicken to a platter. Top with the tomato slices and drizzle with the reserved vinaigrette. Cover the chicken with an even layer of mozzarella and tent the platter loosely with foil. Let the chicken rest for 10 minutes. Serve.

Notes: I'm a sucker for anything caprese related, so when I saw this recipe, it was a no-brainer to test it asap! And I'm so glad I did! So light, yet so robust. A perfect summer dinner. To complete the traditional caprese flavor, I splashed a little balsamic vinegar onto my last few bites.

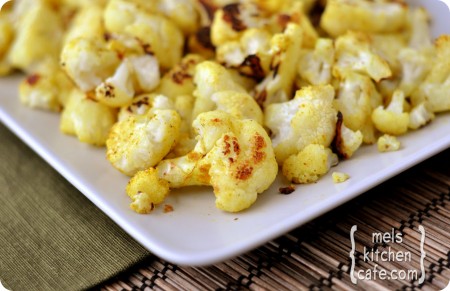
"Curryflower"

Source

Ingredients:
1 medium head cauliflower
1 1/2 tablespoons olive oil
1/2 teaspoon salt
1/2 teaspoon curry powder

Directions
1. Preheat the oven to 475 degrees F. 
2. Wash and core the cauliflower and cut the florets into bite-size pieces. Place in a large bowl. Toss the cauliflower with the olive oil, salt, and curry powder. 
3. Turn out the cauliflower onto a rimmed baking sheet. Bake for 16-18 minutes, stirring every 6-7 minutes, until the cauliflower is browned in spots and is crisp-tender. Serve immediately

Notes: I got a lucious cauliflower in last week's bountiful basket and was looking for more healthy way to prepare it than the au gratin style that I was craving. I stumbled upon this recipe and, viola, one of the most delcious side dishes that I've ever eaten was born. I highly recommend serving immediately out of the oven as the recipe instructs because we took this to a potluck dinner with some friends and the pieces that I sampled before storing and transporting it for 45 minutes were infinitely better than what we ate at the table - the flavor was still wonderful, but the mouth-watering crispy texture was lost. 

Homemade Taco Seasoning

Source: inspired by here, with some additions by me

Ingredients:
2 Tablespoons chili powder
2 Tablespoons ground cumin
2 Tablespoons garlic powder
2 Tablespoons onion powder
1 Tablespoon paprika
1 Tablespoon oregano
1/2 Tablespoon crushed red pepper

Directions:
Mix spices together and store in an airtight container (I use a small tupperware or empty spice jar).  2 Tablespoons of this mix is equal to one package of taco seasoning from the store.

Notes:
I've linked to this recipe a few times in various "taco-ish" recipes I've posted, but I decided that I use it enough that I just need to make it it's own post so I can find it quicker.  Ha.  Anyway, I'm quite happy with it - it's cheap and yummy and tastes just like the real thing.

Crispy Chicken Wraps

Source: adapted from Mel's Kitchen Cafe

Ingredients:
1/3 cup mayonnaise, light or regular
1/4 cup chopped fresh cilantro
3 scallions, sliced very thin (I didn't have any - so I just just 1/4 of a regular white onion, diced fine)
2 celery ribs, chopped fine
2 tablespoons sour cream, light or regular
2 teaspoons hot sauce (I wish I had some true hot sauce, but I didn't, so I just added some of my Pace chunky salsa)
1 rotisserie chicken, skin discarded, meat shredded into bite-sized pieces (about 3 cups) (I had some cooked, shredded chicken in the freezer - about a cup - and it worked awesome)
2 cups shredded cheddar cheese
4 (12-inch) flour tortillas

Directions:
Whisk the mayonnaise, cilantro, scallions, celery, sour cream and hot sauce in a large bowl. Add chicken and toss to combine. Sprinkle cheese over tortillas, leaving 1/2-inch border around edges, then arrange chicken mixture down the center of each tortilla. Roll stuffed tortillas, leaving edges open.  (I found that it's more a folding motion than a "roll" per se - just fold one side of the tortilla over the filling down the middle and then carefully fold the other side over - like you're folding a piece of paper in thirds.) Spray the seam side of the tortillas with cooking spray. Heat a large non-stick griddle on medium heat for 1 minute. Arrange wraps, seam-side down first (this will help the wraps to not fall apart), on pan and cook until golden brown and crisp, about 2-3 minutes per side. Serve.

Notes:
I saw this pop up on Pinterest and it really got me salivating.  I had actually pinned a variation of this recipe from Mel's site a long time ago, but had never gotten around to making it.  It was a bit of a debate once I figured out there were two options for me to choose one for dinner this week, but I ended up making this one because I didn't feel like cooking up some rice.  (Next time I have leftover rice hanging around my fridge  you can bet that those Crispy Southwest Wraps are going to be on my plate!)  Gregg and I both loved these - they were quite filling and totally yummy.  Kind of like a "grown-up" quesadilla.  I also turned some leftover Sweet Potato Taco filling that I had made earlier last week into a crispy wrap for lunch one day.  The possibilities for this technique are endless!

Lemon-Garlic Herb Marinade

Source: inspiration came from Our Best Bites and Recipe Girl

Ingredients:
1 1/2 Tablespoons finely minced or pressed garlic (I think I used 3 cloves, pressed)
1 large or 2 small lemons, zested and juiced (I had one and a half medium lemons, so that's what I used)
1/3-1/2 cup minced fresh herbs, preferably a combo of basil, rosemary, and oregano (I'm sure fresh would have been lovely, but I just had dry so I added a few shakes of each)
1 teaspoon kosher salt (forgot the salt and pepper - whoops)
1/4 teaspoon black pepper
2 Tablespoons (or more) extra virgin olive oil (I might have used just regular canola oil - but it's been too long since I made it that I can't remember all the details!)
1 1/2-2 pounds boneless, skinless chicken breasts (we did chicken, but I think it would be even better on fish - also vegetables were suggested which sounds yummy!)

Directions:
Add garlic, lemon juice and zest, herbs, salt, pepper, and oil to a gallon size ziplock bag (we only needed one because we just did two chicken breasts - but if you have more, you might need to divide it into multiple bags).  Squish it all around to mix.  (If you have fresh herbs, you might want to do like the OBB ladies and pulse it all in a food processor till it's the consistency of "a chunky pesto".)  Add your chicken (or fish or vegetables) and let marinate for about 30 minutes.  Cook your chicken on a pre-heated grill for a few minutes on each side until done.

Notes:
This was really lemony-good flavor on the chicken, but I felt like it would be amazing with some fish - fresh caught trout or something.

Saturday, July 14, 2012

Polish Plum Cake

Makes 12 servings of Polish Plum Cake
Source: About food.com
(with a Kim Blanchard adaptation)

Prep Time: 20 minutes

Cook Time: 40 minutes

Total Time: 1 hour

Ingredients:

  • 2 1/3 cups all-purpose flour
  • 2 1/2 teaspoons baking powder
  • 3/4 teaspoon salt
  • 3/4 + 1/4 cup sugar
  • 1/2 cup (1 stick) soft butter + 3 tablespoons cold butter, cut into pieces
  • 3/4 cup milk
  • 2 large eggs
  • 40 fresh any variety plums, pitted and halved
  • 1/4 teaspoon cloves (I omitted these)
  • and added 1/4 teaspoon of almond flavoring

Preparation:

  1. Lightly coat a 13"x9" pan with cooking spray. Heat oven to 350 degrees. In large bowl, combine flour, baking powder, salt and 3/4 cup sugar. Add 1/2 cup softened butter, milk and eggs. Beat at medium speed 4 minutes.
  2. Pour batter into prepared pan. Place plums on top, cut side up, pushing down slightly into batter.
  3. Cut remaining 1/4 cup sugar and cloves into 3 tablespoons cold butter and sprinkle over plums. Bake about 40 minutes or until a toothpick tests clean.
  4. Let the cake cool in the pan so the plum juices will be reabsorbed to create a moist cake. Sprinkle with confectioners' sugar, if desired, and cut into 12 squares.
Notes from Kim: I have noticed over the years that the French use a lot of plums in their cooking, plum tarts are especially yummy looking.  I got a bunch of plums this morning in my Bountiful Basket and decided to try my hand at making one, so instead of a French Plum Cake, I found a Polish recipe.

I halved the recipe for Paul and I in an 8 x 8 pan. I added almond flavoring and omitted the cloves. And then I could only fit about 8 - 9 plums (pieces) on the top of my cake, even with pushing them down into the batter.  I am not sure of the plum variety, but they are dark skinned, sweet golden light yellow flesh and  tart by the pit.  I just sliced off big pieces since the pits don't come out without cutting.

We ate this hot out of the oven and it was wonderful!!!

Tuesday, July 10, 2012

Teriyaki Meatballs

Inspiration Source (altered by me)

INGREDIENTS:
1 med-lg sweet onion, diced
1 bag frozen stir fry vegetables
1 bag frozen meatballs (I used turkey)
1 can pineapple tidbits or chunks
1 recipe Teriyaki Sauce:
     1/2 cup soy sauce
     1 3/4 cups water
     1 tsp ground ginger
     1/2 teaspoon garlic powder
     1/2 cup packed brown sugar
     2 tablespoons honey
     3 tablespoons cornstarch
     1/2 cup cold water

DIRECTIONS:
1. In a large frying pan or wok, saute diced onion in olive oil until soft. Add vegetables and cook for an additional 5 minutes or until onion is translucent.
2. In the meantime, in a medium bowl mix the soy sauce, water, ginger, garlic powder, brown sugar, and honey together. In a separate small bowl, dissolve the cornstarch into the 1/2 cup cold water. Set both bowls aside
3. Add meatballs and teriyaki sauce to vegetables. Heat on medium-high until sauce is boiling, then reduce heat to low and simmer for 20 minutes or until meatballs are heated through/cooked, stirring occasionally. In last 5 minutes of cooking time, add your cornstarch mixture and stir well.
4. Serve over rice or couscous (I used couscous and prepared it with the drained pineapple juice - yummy!)


NOTES: I still haven't done a major stock-the-fridge grocery shopping trip after moving, so my ingredients are limited to what's in the pantry and freezer. Despite being simple, I'm pleased with how this turned out! The flavor of the sauce was one of the best I've ever had in the meatball department - not too strong/vinegary (like the Farrer's Swedish Meatballs), not too creamy/fattening (like my Stroganoff Meatballs), and not too traditional (like the Meatball Subs with marinara sauce that I was about to prepare).

Saturday, July 7, 2012

Fresh Sweet Cherry Crisp

Source: here


Ingredients:
for the filling:
about 2 pounds of fresh, sweet cherries, pitted (I read somewhere else that this is about 5-6 cups)
1/8-1/4 cup sugar (depending on sweetness of cherries)
2 Tablespoons tapioca
zest of 1/2 lemon (side note: I just bought a zester (microplane) while we were in Logan with a gift certificate from our wedding that was going to expire next month - LOVE it! - not sure how I lived without it till now!)
juice of 1/2 lemon
pinch of salt

for the topping:
3/4 cup brown sugar, packed
1/2 cup flour
1/2 cup quick-cooking oats
1/3 cup butter, cold and diced
pinch of salt

Directions:
After pitting your cherries (this took the longest time of the whole process and my hands looked like a bloody mess when I was done - so wear an apron!), sprinkle the sugar, tapioca, lemon zest and juice, and salt over the cherries in a medium bowl and stir to coat.

In a separate bowl, add the topping ingredients and mix together using a pastry cutter or two knives or a fork until it resembles coarse pebbles.

Butter individual ramekins (about six 1-cup ramekins) or a 9x9 baking dish and spoon the cherry mixture into the bottom.  Top with the brown sugar/flour/oat mixture.  Bake at 375 degrees F for 27-35 minutes (mine were done at exactly 27 minutes) until golden brown on top and the cherry mixture is bubbling.  Serve warm with a scoop of vanilla ice cream.

Notes:
Cherries were on sale this week at our local City Market, and I just couldn't help myself to a big bag.  Then I realized that I just couldn't eat that many cherries before they'd go bad, so I started looking for recipes to use them up.  I know normally cherry crisps and pies are made with the sour pie cherries, but I stumbled across this recipe for a sweet cherry crisp, so I knew I had to give it a try.  Oh my goodness, yum!  Seriously.  This stuff is goooood.  And luckily I have some left over for tonight!

I did cut this recipe in half because while I felt like there were a lot of cherries, I don't think I had quite enough for a full recipe.  So I used ~2 1/2 cups pitted cherries (I just cut them in half and pulled out the pits, though a pitter machine was sounding mighty tempting by the time I was done!), probably 1 1/2 Tablespoons sugar, and I dumped in the full amount of zest (half a lemon-worth).  I just couldn't help myself - it smelled SO good - but it definitely gave the crisp a very lemon flavor, which I thought was delicious, but if you don't want it too lemony, I'd stick with the recipe (so if you're halving it, too, just a quarter of a lemon-worth of zest).  Everything else I just cut in half.  Well, the butter was a little tricky - I think I used like 2 1/2 Tablespoons.  Anyway, it seems to be pretty forgiving.  My half-recipe fit perfectly in two 16-ounce ramekins.  I originally thought Gregg and I would each have one with a nice scoop of ice cream on top, but we decided to split one and save the other for later, which I think was a good idea because it was pretty rich.

Thursday, June 28, 2012

Grampa's Gumbo

Source: Grampa (Paul)


Directions:
Start with one can of Campbell's Chunky "Grilled Chicken and Sausage Gumbo" soup
To this add:
- Chopped green and red peppers
- Jalapenos (I used Mazzetta's "tamed" Jalapeno's)
- Diced rotisserie chicken breast
- Canned or frozen shrimp
- Sliced okra
- Seasoning to taste (Campbell's base is pretty tame). I used Crystal's Louisiana Cayenne Pepper Sauce

Notes:
I'm just posting this for Paul since he sent out a plea for help . . . sounds yummy!  Here's what he says about it:

With Mom out of town for youth conference, I'm trying to be a good domestic back-up here at home. In that spirit, I'm going to make a bold stroke and submit an item for the Bistro. For lack of a better name, we'll just call it Grampa's Gumbo. Mom has been kind of busy this week and I haven't had to travel - so I've tried a few culinary experiments. We had this for dinner last night and loved it.

Wednesday, June 27, 2012

Black Bean and Mango Chicken Salad

Source: adapted from here (after a quick google search for mango + chicken + balsamic + orange juice recipes - see notes for story there!)


Ingredients:
1/2 lb boneless, skinless chicken breasts, grilled and cut (I used one, just sprinkled it generously with salt and pepper and quickly grilled it ~5-7 minutes on each side)
1 15 oz can black beans, drained and rinsed
~ 1 cup frozen corn, thawed
1 ripe mango, chopped (for a cool "tutorial" on how to do this, check out this site)
1/2 cup (about 1/2 of a medium-sized one) green pepper, chopped
1/3 cup sweet onion (I may have used less - I'm not a huge raw onion fan)
1/3 cup fresh cilantro, chopped
1/4 cup lime juice (I just used the juice of one lime, which was less than 1/4 cup, but it was fine)
1/3 cup balsamic vinegar (I only did about half that)
1 Tablespoon honey
2 Tablespoons preserves (the recipe suggests pineapple or mango or orange marmalade, but I only had store-brand strawberry spread in the fridge and it was great)
1/4 cup extra virgin olive oil
1 teaspoon garlic powder (I used one minced clove of garlic)
1/2 Tablepsoon soy sauce
1/2 teaspoon black pepper (I skimped on this - used maybe 1/4 teaspoon?)
1/2 teaspoon ground red pepper flakes
salt, to taste
tortilla chips

Directions:
Mix the chicken, beans, corn, mango, pepper, onion and cilantro in a medium-sized mixing bowl.  Whisk together the rest of the ingredients into a dressing and pour over the ingredients in the bowl.  Chill and serve with tortilla chips.

Notes:
I bought my first ever mango (they were on sale this week) with the intent to make a balsamic-glazed grilled chicken with mango recipe that I found about a month ago.  When I got home I realized I didn't buy the mango nectar that that recipe called for, and thus began the search for something to substitute.  I had orange juice in the fridge and wondered if that would be an acceptable substitute for the mango nectar, so I added it to my google search.  What I found first was this delightful recipe that totally piqued my interest.  No pictures on the site, which almost turned me off because I really love to see a picture of what I'm going to make.  But I'm glad I didn't let that deter me.  This was yummy!  Very fresh and cool and summery.  It reminds me a lot of Cowboy Caviar, though obviously not exactly the same.  I'm a fan.  And I'm totally sold on mangos - talk about yum!  I hope they stay on sale!  :)

Sunday, June 24, 2012

Pineapple-Black Bean Guacamole

Pineapple-Black Bean Guacamole


Source: bhg.com 

Ingredients
2 medium avocados (halved, seeded, and peeled)
1/4 cup bottled green salsa (salsa verde)
1 tablespoon sour cream
1/2 cup finely chopped fresh pineapple or canned crushed pineapple (drained)
1/2 cup canned black beans (rinsed and drained)
1 fresh jalapeno chile pepper (seeded and minced)
2 tablespoons finely chopped red onion
2 tablespoons chopped fresh cilantro
1 tablespoon minced garlic
1 tablespoon lime juice
1/4 teaspoon salt
1/4 teaspoon ground cumin
1/4 cup shredded Monterey Jack Cheese

DirectionsIn a large bowl, mash avocados. Stir in salsa and sour cream until combined. Stir in pineapple, beans, jalapeno, onion, cilantro, garlic, lime juice, salt, and cumin. Cover and chill for 2 hours or until ready to serve. Sprinkle with cheese. If desired, sprinkle with cilantro and serve with tortilla chips. 

Notes: Soooo yummy! Creamy and delicious! I have a heat-sensitive hubby, so I omitted the jalapeno which only emphasized the creamy flavor) and also omitted the cheese because I didn't want the texture (and extra calories).

Bean Soup with Kale


BEAN SOUP WITH KALE


Source: Adapted from a recipe I found at allrecipes.com

Total prep and cook time: ½ hour

Ingredients:
            1 T canola or olive oil
            5 garlic cloves, chopped
            1 medium white onion chopped
            4 cups coarsely chopped raw kale (2 inch pieces)
            1 large or two medium tomatoes- chopped
            4 cups chicken or vegetable broth (I used 3 cans)
            2 cans white beans (I used small white)- do not drain or rinse
            1 teaspoon dried oregano
            1 teaspoon dry basil
            Salt and pepper to taste

Directions:
            In large pot heat oil, add garlic and onion and sauté until soft.  Add kale and sauté stirring until wilted.

Add 3 cups of broth and 2 cups of beans and all of the tomato, herbs, salt and pepper.  Simmer 5 minutes.  In a blender or food processor mix the remaining beans and broth until smooth.  Stir into soup to thicken.  Simmer 10 minutes.
Ladle into bowls

YUMMY

Comments: this recipe was fabulous, we loved it!.  The original recipe called for more garlic and another seasoning, but I wouldn’t change it, it was great! And I loved the kale, it was the first time I had ever tasted it!

Monday, June 18, 2012

Reese's Peanut Butter Cup Cake

Pinned Image


Recipe source and picture source

Cake Ingredients: 
1 Devil's Food chocolate cake mix with butter and milk substituted for oil and water (personal preference)
Cake Directions: 
Prepare according to package directions, bake in 2 9" round pans, cool completely. 

Filling Ingredients:
8 oz semi-sweet chocolate, roughly chopped (I used milk chocolate)
8 oz heavy cream
1/2 cup creamy peanut butter
1/2 cup Reese's peanut butter cups, roughly chopped
Filling Directions: 
Heat the cream until it just begins to boil. Pour it over the chocolate in a medium bowl. Whisk until the chocolate melts, then whisk in the peanut butter until it's all incorporated and smooth. Set aside 1/4 of the filling for the first layer of frosting. Cool the other 3/4 completely, then gently stir in the peanut butter cups.

Frosting Ingredients:
1/2 cup creamy peanut butter
1/2 cup butter, at room temperature
2 tsp vanilla extract
2 cups powdered sugar (I an extra 1/2-1 cup plus a splash of milk for a smoother consistency)
Frosting Directions:
Cream together the butter and peanut butter. Add the vanilla, then the sugar. Beat until fluffy.

Assembly Directions:
Place one 9-inch round on a cake stand or plate. Cover the top in the peanut butter fudge filling. Place the second 9-inch round on top. Using the reserved filling, spread a thin layer on the outside of the cake. Refrigerate until the fudge is set and firm to the touch.

Slather the whole thing in the peanut butter frosting. Decorate with peanut butter cups.

Notes: Made this for Father's Day/Melia's Birthday celebration with the extended Farrer family yesterday. Yes, it is as good as it looks...and better.

Spinach Smoothie

SourceSpinachSmoothie.net with some tweaking

Ingredients
  • spinach leaves, two big handfuls
  • banana, one
  • blueberries, one handful
  • orange juice, about 1/2 cup
  • skim milk and/or vanilla low-fat yogurt, about 1/2 cup (I did a bit of both)
  • honey (optional)
  • ice, about 5-6 cubes
Directions:
  1. Blend until smooth.
  2. Don't look too closely at the smoothie's color. . .trust me.*
  3. Enjoy!
Comments

This summer, I am committing to eat healthier, lose weight, exercise more, and all that jazz, and one of the ways I'm trying to do that is with homemade smoothies.  (My poor blender's been getting a workout!)  I just made this one for dinner tonight, and it was fabulous!  I wanted to pin it on Pinterest, but couldn't since there wasn't a photo (I soon realized why: blueberries and spinach make a horrible color combination).  Anyway, I'm posting it on here so I can access this recipe again!  It had a wonderful, sweet, creamy flavor (which I prefer) without being too tart (which is what Scott prefers) or spinachy.  The website didn't give any specific amounts, so I just approximated and listed what I used.

*Note:  Normally, Scott is more than willing to sample my smoothie concoctions, but one look at this one, and he passed.