Source: Sister Whitesides (who calls it "Juniper's Chicken Salad" - so maybe it's a secret recipe from Juniper Inn?)
Servings: based on other recipes I found online, I estimated this to serve 5-6 (on regular to biggish dinner rolls) - obviously this can be adjusted depending on the size of your rolls/croissants/etc.
Ingredients:
3-4 cooked chicken breasts, shredded (Sister W. used Sam’s roasted deli chicken)
3-4 stalks celery, diced (or as much or as little as you like)
1 cup grapes, cut in half (or more)
¼ cup sliced or slivered almonds (I've used a can of cashews before and they were great!)
¼ bunch green onions, thinly sliced
¼ cup mayonnaise
¼ cup miracle whip salad dressing
1 T fresh lemon juice
1 t Lawry’s season salt
Directions:
Combine the mayo, miracle whip, lemon juice and seasoned salt and mix till smooth. Put the dressing on the chicken, celery and onions early in the day . . . then add the grapes and cashews at the last minute, right before serving. (If you put the grapes in too early, sometimes it gets kinda watery . . . and you want the nuts to be crunchy).
Notes:
I whipped up a triple batch of this salad for girls camp (omitting the nuts because I forgot to buy them!) and it was a hit at lunch on a hot afternoon in the mountains. I made it on Monday evening, leaving the grapes out until we were ready to serve it on Wednesday after our hike, and it worked out great. I've also made it for a bridal shower and served it on little dollar rolls. Very easy and tasty and chic!

Thursday, June 30, 2011
Monday, June 20, 2011
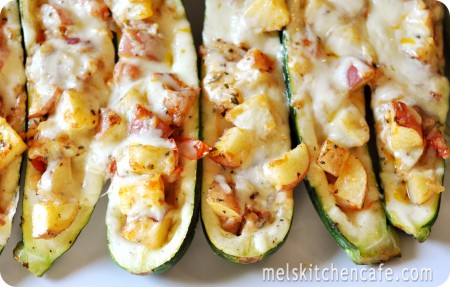
Stuffed Zucchini
Source: Mel's Kitchen Cafe
4 medium zucchini (about 8 ounces each), washed
4 tablespoons olive oil
3 medium red potatoes (about 1 pound), cut into 1/2-inch cubes
1 medium yellow or red onion, chopped fine
5 large cloves garlic, finely minced
3 medium tomatoes (about 1 1/4 pounds), seeded and chopped
1/3 cup shredded fresh basil leaves or 1 tablespoon dried
6 ounces Monterey Jack cheese, shredded (about 1 1/2 cups)
Adjust one oven rack to upper-middle position and second oven rack to lowest position, then place a rimmed baking sheet on each rack and heat oven to 400 degrees.
Meanwhile, halve each zucchini lengthwise. With a small spoon, scoop out the seeds and most of the flesh so that the walls of the zucchini are about 1/4-inch thick all the way around. Season the cut sides of the zucchini with salt and pepper and brush them lightly with 2 tablespoons of the oil. Set the zucchini halves cut-side down on the hot baking sheet that has been preheating on the lower rack. Meanwhile, toss the potatoes with 1 tablespoon of the olive oil, salt, and pepper, to taste, in a small bowl and spread in a single layer on the hot baking sheet that has been preheating on the upper rack. Roast the zucchini until slightly softened and skins are slightly wrinkled, about 10 minutes while simultaneously roasting the potatoes until they are tender and lightly browned, 12 to 14 minutes. When the zucchini has finished baking, remove it from the oven and using tongs, flip the zucchini halves over on the baking sheet and set aside.
While the zucchini and potatoes are roasting, heat the remaining tablespoon oil in a 12-inch skillet over medium heat until shimmering, about 2 minutes. Add the onion and cook, stirring occasionally, until softened and beginning to brown, about 10 minutes. Stir in the garlic and cook until fragrant, about 30 seconds. Add the tomatoes and cooked potatoes; cook, stirring occasionally, until heated through, about 3 minutes. Off the heat, stir in the basil, 1/2 cup cheese, and salt and pepper to taste.
Divide filling evenly among the zucchini halves on the baking sheet, spooning about 1/2 cup into each, and packing it lightly; sprinkle with remaining cheese. Return the baking sheet to the oven, this time to the upper rack, and bake the zucchini until heated through and cheese is spotty brown, about 6 minutes. Serve immediately.
Notes: Served this as part of our Father's Day menu last night. Oh my goodness! It was absolutely incredible! This will soon be a staple in our summer diet.
Friday, June 17, 2011
Pasta with Creamy Pumpkin Sauce
Source: kraftfoods.com

Ingredients:
1 pkg. (16 oz.) penne pasta
1 pkg. (8 oz.) PHILADELPHIA Cream Cheese, cubed
1/2 cup KRAFT Grated Parmesan Cheese
1/2 cup (1 stick) butter or margarine
1/2 cup milk
1 cup canned pumpkin
1/2 tsp. ground red pepper (cayenne)
Ground nutmeg to taste
Directions:
Notes:Oh my goodness. This was an incredible dinner in the heat of summer, I can't imagine how great it will taste in the fall (when the pumpkin flavor is more applicable). To be fair, I should warn that this is NOT a low-calorie meal! I had some leftover pumpkin to use after making Heather's Maori Bread, and this piqued my interest. I tried it for fun, but I think my arteries will be recovering until this autumn when I make it again. Wow. Oh, SO delicious though!
Directions:
Cook pasta as directed on package.
Meanwhile, cook cream cheese, Parmesan, butter and milk in large saucepan on low heat until cream cheese is melted, stirring frequently. Add pumpkin and seasonings; stir. Cook until heated through, stirring occasionally.
Drain pasta; place in large bowl. Add cream cheese sauce; toss to coat.
Notes:Oh my goodness. This was an incredible dinner in the heat of summer, I can't imagine how great it will taste in the fall (when the pumpkin flavor is more applicable). To be fair, I should warn that this is NOT a low-calorie meal! I had some leftover pumpkin to use after making Heather's Maori Bread, and this piqued my interest. I tried it for fun, but I think my arteries will be recovering until this autumn when I make it again. Wow. Oh, SO delicious though!
Sunday, June 12, 2011
Dutch Oven Stromboli
Source: a little bit of here, here, and here
Ingredients:
1 tube Pillsbury pizza dough (or, even better I think, one loaf frozen bread dough (like Rhodes, but WF works great, too))
1 tube Pillsbury crescent rolls
1 can pizza sauce (or I just use 1 can tomato sauce sprinkled with pizza seasonings - oregano, basil, garlic, onion, etc.)
shredded mozzarella cheese
toppings of your choice (we used pepperoni, but you could do anything that you like on pizza - I even read a recipe for ham, roast beef, swiss cheese and spinach and used a mustard sauce instead of pizza sauce that sounded really yummy!)
Directions:
Spread ~1 TB vegetable oil around the bottom and up the sides of a 12" Dutch oven. Open the pizza dough tube and carefully unroll the dough onto the inside of the clean, cool lid. Use your hands to stretch and form it into a circle the size of the lid (or a bit larger - it doesn't have to be perfect!) and then place the dough in the bottom of the oiled Dutch oven. Press the dough up the sides a little bit and squish it all into place (if you had a pastry roller, it might be really nice to use for this part!). Spread the dough with pizza sauce to your liking, then sprinkle with cheese and add toppings. Open the crescent roll tube and carefully unroll the dough onto the inside of the lid again. Pinch the pieces together to form a circular shape (again, perfection is not necessary) and place carefully on top of the pizza inside the oven. Pinch the top crust to the bottom crust to make a pocket. Cook with most coals on top until the crust is golden brown. Slice with a pizza slicer and use extra pizza sauce to dip, if desired.
Notes:
At a girls camp planning activity last week, we were deciding on what we were going to eat - the girls called out ideas and we wrote them on the board. Eventually we had to vote to whittle the menu down to three dinners that we would make at camp. Stromboli was one of those winners. I didn't even know what stromboli was, but I figured it could be made in a Dutch oven after I heard the description from one of the girls and leaders. A quick search online convinced me that, yes, it really was possible, so Gregg and I decided to break out one of our wedding Dutch ovens this weekend in Green Canyon and give it a shot. Turns out, stromboli in the Dutch oven was most delicious, and really quite simple. I would suggest that you use high quality coals and make sure you've got plenty of them - that will definitely cut down on cooking time if you've got good, hot coals. (We ended up having to make a fire next to the pot to supplement the heat, and doing a little rotation thing so the pot didn't get too hot on one side ... but it was worth the wait and hassle!) I'm not so worried about camp now! (And I'm grateful for a husband who is willing to eat my experiments!)
Saturday, June 4, 2011
Chocolate Chip Cookie Dough Cheesecake

Source: Mel's Kitchen Cafe
Ingredients:
Crust:
4 tablespoons butter, melted
2 1/2 cups chocolate cookie crumbs (Mel likes to use chocolate Teddy Grahams but you could use any chocolate wafer cookie or even Oreos - I used store-brand chocolate graham crackers and they were perfect)
Filling:
4 (8-ounce) blocks cream cheese, softened to room temperature
1 cup sugar
4 large eggs
1 teaspoon all-purpose flour
1 teaspoon vanilla
1 cup sour cream (Light works just fine)
Cookie Dough:
½ cup butter, softened
½ cup sugar
½ cup packed light brown sugar
2 tablespoon water or milk
2 teaspoon vanilla extract
1 cup all-purpose flour
1/4 teaspoon salt
1 cup mini chocolate chips (I didn't have any so I tried chopping my regular chips into bits - and I ended up just using the whole chocolate chips which was fine, though maybe not as cute)
An additional 1 cup mini chocolate chips to fold into the batter with the cookie dough balls
Garnish:
1 cup heavy whipping cream, whipped to stiff peaks (add 1 tablespoon powdered sugar while whipping if you like a bit of extra sweetness)
Mini chocolate chips, for sprinkling
Directions:
For the cookie dough: In a medium bowl, combine the butter and sugars for the cookie dough. Add the water (or milk), vanilla and blend. Mix in the flour, salt and the chocolate chips. The dough will be fairly soft. Gently roll the dough into small balls (about a teaspoon size, maybe a bit larger) and place them on a wax paper lined plate or baking sheet. Place them in the freezer to harden while making the rest of the cheesecake.
For the crust: Lightly grease the bottom and sides of a 10-inch springform pan. In a medium bowl, combine the butter with the chocolate cookie crumbs (you could easily use a food processor to crush the cookies and incorporate the butter). Press onto the bottom and about halfway up the sides of the prepared pan.
For the cheesecake: Using an electric mixer on high speed, beat the cream cheese, sugar, eggs and flour until smooth. Add the vanilla and sour cream and mix just until blended. Be careful not to overmix – incorporating too much air into the batter can contribute to a cheesecake cracking on top during baking.
Pour half the batter into the prepared crust. Gently stir in the cookie dough balls and the additional 1 cup mini chocolate chips into the remaining batter. Pour into the pan, spreading the batter to the sides of the pan and evening it out across the top (it is ok to see bumps of cookie dough here and there, smooth it the best you can). Bake the cheesecake at 325 degrees for one hour. Turn off the oven and prop the door open several inches. Let the cake sit in the oven for an additional 30 minutes. Remove the cake from the oven and let it cool completely on a wire rack. Refrigerate until chilled (ideally, overnight). To serve, cut into slices and top with whipped cream and mini chocolate chips.
Notes:
We decided to try this cheesecake for Gregg's birthday dessert on a whim after seeing a picture of it on Mel's Kitchen Cafe during a little recipe blog stalking. (P.S. Check out her site for some divine pics of this creation - that's what sold me on the whole adventure.) It was my first ever attempt at a baked cheesecake and lucky for all involved it turned out to be a success. This stuff is good. Rich, sweet, and darn delicious! So, if you have some time and are not afraid of a recipe with four (4!) blocks of cream cheese, then this is the dessert for you! :)
Subscribe to:
Posts (Atom)