Source: Mel's Kitchen Cafe
Servings: 6-8
Ingredients:
6 fresh or frozen chicken breasts
1 (20-ounce) can crushed pineapple, drained
1 (15-ounce) can black beans, rinsed and drained
1 (15-ounce) can white beans, like Great Northern, rinsed and drained
2 cups mild or medium salsa
Directions:
Place the chicken in the crock pot and add the rest of the ingredients. Cook on low for 6 to 8 hours. (We did high for about 4-5 hours.) Using tongs, remove the chicken to a cutting board and shred into bite-size pieces. (I couldn't even move my chicken out - I tried, but it just fell apart on my fork, so I just shredded directly in the pot.) Mix the chicken back in with the rest of the ingredients. The mixture will be fairly soupy – Mel likes to drain off some of the excess liquid before serving, especially if she's eating it in tortillas, so it doesn’t make everything soggy. Wrap in a trotilla or serve with tortilla chips and garnishes, like tomatoes, cheese, avocado, sour cream, etc. (Or we tried it on top of rice, with the same garnishes ... it was delish!)
*Freezable Option: Mel freezes the leftovers in freezer-safe ziploc bags and either places the frozen portion in her crockpot for a few hours the day she wants to serve it or thaws it the night before in the refrigerator and reheats on low in a saucepan.
Notes:
We basically halved this recipe and cooked it in a small crock pot and it was oodles for us - three meals-worth, actually. I really liked using it as nacho meat, but serving it with rice was darn tasty, too. Also, a couple pluses I'm finding to this whole crock pot thing: a) it's oh-so-easy to assemble the recipes that are cooked in them, and b) if you're home all day, you get to smell the yummy deliciousness through your house. (Or maybe that last one isn't so good after all ...)

Tuesday, May 31, 2011
Wednesday, May 18, 2011
Chocolate Chip Waffles

Source: Tasty Kitchen
Prep Time: 10 minutes
Cook Time: 15 minutes
Servings: 8
Ingredients:
4 cups all purpose flour (I used half whole wheat)
1 teaspoon salt
3 Tablespoons sugar
3 teaspoons baking soda
1-1/2 cup chocolate chips
4 cups buttermilk (I never have buttermilk, so I just use the ol' lemon juice/vinegar trick: pour 1 TB lemon juice into a measuring cup then fill to 1 cup line with milk - increase volumes proportionately as needed)
4 whole eggs
1 stick butter, melted
1 teaspoon vanilla
Directions:
Whisk together flour, salt, sugar, and baking soda. Toss in chocolate chips and coat well with flour mixture. Mix together buttermilk, eggs, butter, and vanilla. Pour into dry mixture and stir together just until combined. Pour batter into a waffle iron and cook to your iron’s instructions. Serve immediately with your favorite syrup.
Notes:
I had seen this recipe earlier in the week during my food-blog-stalking routine and I bookmarked it for future testing. Well, that testing came last week when I had some milk I needed to use up before it went bad and a chocolate-chip craving to fulfill. I whipped up a (half) batch for dessert one night. We topped our warm waffles with a scoop of vanilla ice cream and a drizzle of chocolate (for me) and caramel (for Gregg) syrup. Yummy! The leftovers were great the next morning for breakfast, after being warmed in the toaster, or even just cold. Good stuff. This one's a keeper.
Also, as a side note, I learned the messy way what my waffle iron's batter capacity is:

:)
Monday, May 16, 2011
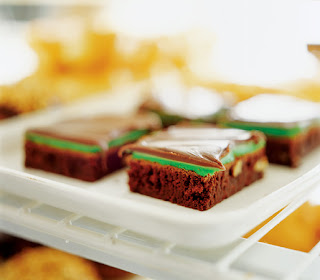
BYU Mint Brownies
Source: BYU Sugar 'n Spice, Cougareat Food Court

Servings: Makes one 9x13 pan of brownies.
Prep and Cook: 90 min.
Cool: 1 hr.
Ingredients for Brownies:
- 1 c. margarine
- 1/2 c. cocoa
- 2 Tbsp. honey
- 4 eggs
- 2 c. sugar
- 1 3/4 c. flour
- 1/2 Tbsp. baking powder
- 1/2 tsp. salt
- 1 c. chopped walnuts
- 12 oz. chocolate icing (Use your own icing recipe or purchase some chocolate frosting. You can also search the Internet for chocolate icing recipes.)
Ingredients for Mint Icing:
- 5 Tbsp. margarine
- dash of salt
- 3 Tbsp. milk
- 1 Tbsp. light corn syrup
- 2 1/3 c. powdered sugar
- 1/2 tsp. mint extract
- 1-2 drops green food coloring
Directions:
- Melt margarine and mix in cocoa. Allow to cool. Add honey, eggs, sugar, flour, baking powder, and salt. Mix well. Add nuts. Pour batter into a greased 9-by-13 baking pan. Bake at 350 degrees for 25 minutes. Cool.
- Prepare mint icing: Soften margarine. Add salt, corn syrup, and powdered sugar. Beat until smooth and fluffy. Add mint extract and food coloring. Mix. Add milk gradually until the consistency is a little thinner than cake frosting.
- Spread mint icing over brownies. Place brownies in the freezer for a short time to stiffen the icing. Remove from the freezer and carefully add a layer of chocolate icing.
Comments:
Okay, I don't know if the Aggie portion of our family will appreciate this recipe as much as I did, but this is the recipe for THE mint brownies at BYU! (Back me up here, Ryan and Vickie!) I don't know how many of these crazy-yummy brownies I served up while working at Sugar 'n Spice in the Cougareat or how many I inhaled during my four years at BYU. These things are world famous (and addicting)!
I was even at a conference last year in the Harmon Building at BYU with a few of my Riverview colleagues. None of them had gone to BYU (in fact, I think only one was LDS), so when they set huge trays of these babies out on the buffet tables for snack time, I had to enlighten them. They couldn't believe how insanely tasty they were. I admit, I ate at least three (and they were HUGE) and snuck home another three home in my purse. So incredible. . .and brought back many fun memories. You better believe I'll be making these this weekend!
Wednesday, May 11, 2011
Mango-Watermelon Salsa

Source
Ingredients
2 cups diced watermelon
1 cup diced mango
¾ cup diced, de-seeded, peeled cucumber
¾ cup diced jicama
2-3 green onions, finely chopped
1 serrano chile, with half the seeds
1 small avocado, diced
1 tablespoon lime juice
1 teaspoon sugar
1 teaspoon olive oil
1 teaspoon rice vinegar
2 tablespoons each of fresh chopped mint and cilantro
Salt, to taste
Notes
I sampled this at our Cinco De Mayo party and fell in love - a perfect blend of sweet and savory. It's wonderful with chips, and, believe or not, on steak. Yum!
Sunday, May 1, 2011
Naan -- Indian Flatbread
Source: Mel's Kitchen Cafe
Serivngs: makes about 12 pieces of Naan
Ingredients:
3-4 cups all-purpose flour (I did half whole wheat and it was delightful)
1 teaspoon salt
1/2 teaspoon active dry or instant yeast
1 1/2 cups milk
1 teaspoon sugar
3-4 tablespoons melted butter
Directions:
Pour the milk into a liquid measure and heat in the microwave until warm to the touch (about 110 degrees F on an instant-read thermometer). If using active dry yeast, mix the sugar and yeast into the milk and let it sit for 4-5 minutes until the mixture is foamy and the yeast has activated. Once the yeast/milk mixture is foamy, pour the mixture into a large bowl or the bowl of a stand mixer and add the salt and 2 1/2 cups of the flour (proceed with the second paragraph of the recipe). If using instant yeast, pour the warm milk into a large bowl or the bowl of an electric stand mixer. Add the sugar, instant yeast, salt and 2 1/2 cups of the flour. Proceed as directed below.
Mix well to combine. Continue adding flour gradually in small amounts, until a soft dough is formed that cleans the sides of the bowl. Knead the dough by mixer or hand until it is smooth and elastic, about 3-5 minutes in the mixer or 10 minutes by hand.
Place the dough in a lightly greased bowl and let it rest at room temperature, covered lightly with greased plastic wrap, for about 2 hours. (I actually made my dough Saturday night and put it in a tightly covered bowl in the fridge till we got home from church - about 16 hours - and it seemed to work fine).
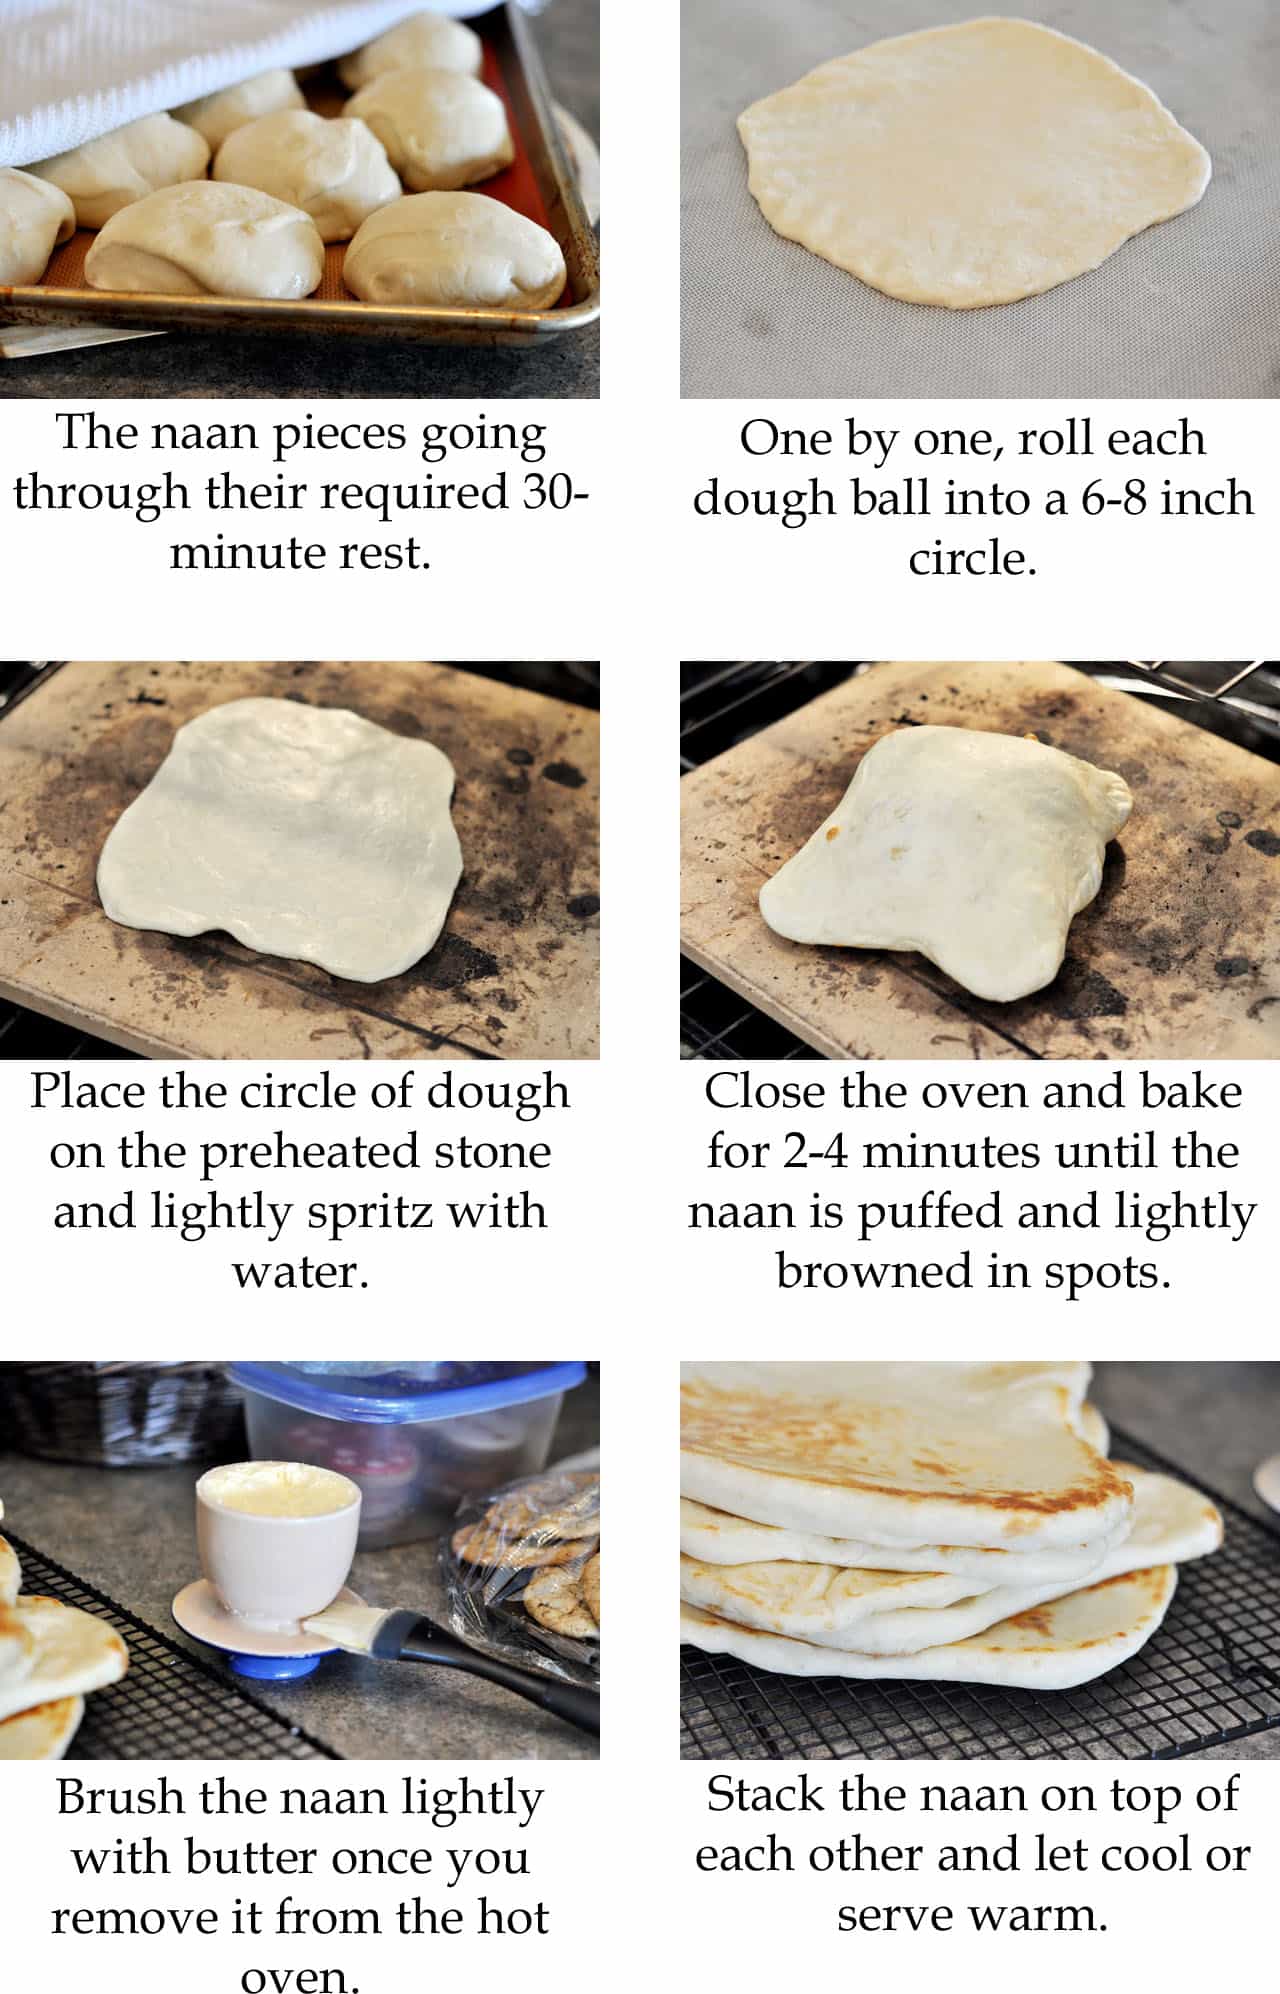
After the dough has rested, turn it onto a lightly floured surface and divide the dough into 12 equal pieces, rounding each into a ball shape. (I cut the blob of dough into wedges with a pizza cutter, then kind of folded/rolled them into balls - check out Mel's website for step-by-step photos). Cover the pieces with a towel and let them rest for 30 minutes. While the dough rests, preheat your oven to 500 degrees F and place a pizza stone on the bottom rack of the oven. (If you don’t have a pizza stone, try grilling the dough on a lightly oiled outdoor grill or use a hot griddle to bake the naan – you’ll have to experiment with cooking times but I’ve seen either of those methods used with cooking naan also.)
Once the dough has rested for 30 minutes, one by one, roll each piece into a circle about 6-8 inches wide, depending on how thin or thick you want your naan. Lay the circle of dough on the hot pizza stone and spritz lightly with water. Close the oven and bake the naan for 2-4 minutes, until it is lightly puffed (some pieces will puff more than others) and brown spots begin to appear on the top. Remove the naan from the baking stone and place on a cooling rack. Brush lightly with melted butter (garlic powder mixed in the melted butter was pretty tasty, too). Stack the hot naan on top of each other as it comes out of the oven. Cover with a towel and let the naan cool completely or serve warm.
Notes:
I was feeling in the mood for some Indian food the last little while, and I've been collecting a variety of recipes for curry dishes and Naan. Let me just say that the Chicken with Green Curry Sauce I made today wasn't all that I was hoping for, but this Naan was AWESOME. Really so yummy and simple (really, if you're scared of yeast, don't be ... this recipe is not hard and it doesn't take much time at all - besides the resting periods, so plan ahead for that). Our first few pieces turned into round fluffy pockets full of steam, rather than flatbread, but by the last batch (we did 2-4 pieces at a time because they were quite small) I had figured out how thin to roll the dough. I found it helped to kind of stretch it out with my hands after rolling to make it really quite thin. Yum. Perfect for sopping up sauces and scooping up rice (and making an otherwise rather bland meal turn out tasty).
Serivngs: makes about 12 pieces of Naan
Ingredients:
3-4 cups all-purpose flour (I did half whole wheat and it was delightful)
1 teaspoon salt
1/2 teaspoon active dry or instant yeast
1 1/2 cups milk
1 teaspoon sugar
3-4 tablespoons melted butter
Directions:
Pour the milk into a liquid measure and heat in the microwave until warm to the touch (about 110 degrees F on an instant-read thermometer). If using active dry yeast, mix the sugar and yeast into the milk and let it sit for 4-5 minutes until the mixture is foamy and the yeast has activated. Once the yeast/milk mixture is foamy, pour the mixture into a large bowl or the bowl of a stand mixer and add the salt and 2 1/2 cups of the flour (proceed with the second paragraph of the recipe). If using instant yeast, pour the warm milk into a large bowl or the bowl of an electric stand mixer. Add the sugar, instant yeast, salt and 2 1/2 cups of the flour. Proceed as directed below.
Mix well to combine. Continue adding flour gradually in small amounts, until a soft dough is formed that cleans the sides of the bowl. Knead the dough by mixer or hand until it is smooth and elastic, about 3-5 minutes in the mixer or 10 minutes by hand.
Place the dough in a lightly greased bowl and let it rest at room temperature, covered lightly with greased plastic wrap, for about 2 hours. (I actually made my dough Saturday night and put it in a tightly covered bowl in the fridge till we got home from church - about 16 hours - and it seemed to work fine).
After the dough has rested, turn it onto a lightly floured surface and divide the dough into 12 equal pieces, rounding each into a ball shape. (I cut the blob of dough into wedges with a pizza cutter, then kind of folded/rolled them into balls - check out Mel's website for step-by-step photos). Cover the pieces with a towel and let them rest for 30 minutes. While the dough rests, preheat your oven to 500 degrees F and place a pizza stone on the bottom rack of the oven. (If you don’t have a pizza stone, try grilling the dough on a lightly oiled outdoor grill or use a hot griddle to bake the naan – you’ll have to experiment with cooking times but I’ve seen either of those methods used with cooking naan also.)
Once the dough has rested for 30 minutes, one by one, roll each piece into a circle about 6-8 inches wide, depending on how thin or thick you want your naan. Lay the circle of dough on the hot pizza stone and spritz lightly with water. Close the oven and bake the naan for 2-4 minutes, until it is lightly puffed (some pieces will puff more than others) and brown spots begin to appear on the top. Remove the naan from the baking stone and place on a cooling rack. Brush lightly with melted butter (garlic powder mixed in the melted butter was pretty tasty, too). Stack the hot naan on top of each other as it comes out of the oven. Cover with a towel and let the naan cool completely or serve warm.
Notes:
I was feeling in the mood for some Indian food the last little while, and I've been collecting a variety of recipes for curry dishes and Naan. Let me just say that the Chicken with Green Curry Sauce I made today wasn't all that I was hoping for, but this Naan was AWESOME. Really so yummy and simple (really, if you're scared of yeast, don't be ... this recipe is not hard and it doesn't take much time at all - besides the resting periods, so plan ahead for that). Our first few pieces turned into round fluffy pockets full of steam, rather than flatbread, but by the last batch (we did 2-4 pieces at a time because they were quite small) I had figured out how thin to roll the dough. I found it helped to kind of stretch it out with my hands after rolling to make it really quite thin. Yum. Perfect for sopping up sauces and scooping up rice (and making an otherwise rather bland meal turn out tasty).
Subscribe to:
Posts (Atom)