Tuesday, January 31, 2012

Taco Beef Soup

Source: adapted from The Essential Mormon Cookbook


Ingredients:
1 pound ground beef
1/2 medium sized onion, chopped
1/2 green bell pepper, chopped
3 cups water
1 (26-ounce) can stewed tomatoes, undrained
2 (16-ounce) cans kidney beans, rinsed and drained
2 (8-ounce) cans tomato sauce
1 (1.5-ounce) packet taco seasoning mix (I used a couple tablespoons of a homemade mix I whipped up a while ago)
1 (16-ounce) can corn (I didn't add this because I forgot - it's not in the original recipe - but I thought it might be a tasty addition . . . next time!)

optional toppings:
cheddar cheese, grated
tomatoes, chopped
green onions, chopped
corn chips
sour cream
avocado, chopped

Directions:
In a large saucepan cook ground beef, onion, and pepper until meat is browned; drain off excess fat.  Add the water, stewed tomatoes, kidney beans, tomato sauce and taco seasoning.  Simmer, covered, for at least 15 minutes.  Top with optional toppings - whatever floats your boat (I load mine up with tortilla chips, a dollop of sour cream and a sprinkling of cheese . . . mmmm!)

Notes:
I've always loved taco soup, but I didn't have tomato juice required for the recipe I'm used to making, so I did a little searching and found this one in my trusty Mormon cookbook.  It hit the spot on a windy, cold January evening.

Jalapeno Cheese Scones

Source: Joy the Baker, via my friend Anika on Pinterest


Ingredients:
2 cups all-purpose flour
2 Tablespoons cornmeal
1 Tablespoon baking powder
1 teaspoon salt
8 Tablespoons (1 stick) unsalted butter, cold, cut into small cubes
2 large eggs
1/2 cup heavy cream  (plus more for brushing the tops of the scones) (I just used 2% milk because that's what we had and it worked great)
1/4 pound pepper jack cheese, cut into small cubes (I only had sharp cheddar, and it was yummy, but I'm sure pepper jack would be awesome!)
2 medium jalapenos, some seeds removed, diced small  (I halved the recipe and still used 2 jalapenos, so if I was making a full batch, I'd definitely double these)
2 teaspoons olive oil
1 tablespoon all-purpose flour

Directions:
Place a rack in the center of the oven and preheat to 400 degrees F.

Heat 2 teaspoons of olive oil in a small saute pan and cook diced jalapenos  until softened, about 3 to 5 minutes.  Let the diced peppers cool and them mix with the diced cheese.  Toss mixture in 1 tablespoon of flour and set aside.

In a large bowl, whisk together the flour, cornmeal, baking powder and salt.  Work in the cold butter with your fingers until the mixture resembles coarse meal.  Some butter pieces will be the size of peas and the flour will be nice and crumbly.

Whisk together 2 eggs and heavy cream.  Add the wet ingredients all at once to the dry ingredients, fold together with a fork until almost fully incorporated.  Add the jalapeno and cheese mixture to the shaggy dough and work together.  Turn dough out onto a lightly floured surface and knead for about 30 seconds.  Form into a disk  about 8 inches around and 2 inches thick.  Cut disk into six wedges and refrigerate for 10 minutes before baking.

When ready to bake, place chilled scones onto a baking sheet lined with parchment paper.  Brush with heavy cream and sprinkle with coarse sea salt (next time I think I'd leave the salt off - the crunch was a little weird to me with the soft and fluffly scone and I feel like they were just too salty with it).  Bake for 20 to 25 minutes until golden brown and delicious.  These are best served the day they’re made.

Notes:
My friend Anika had shared her love of these delightful little scones with me, so I knew someday I'd like to try them.  Well, someday turned into yesterday and I made a little batch to go along with our taco soup dinner last night.  Yum.  I couldn't really taste the jalapeno flavor (they're definitely not spicy) when the scones were hot out of the oven, but as they cooled down a bit, their flavor really came out.  I love jalapeno!  Both Gregg and I were (pleasantly) surprised how light and fluffy these were, too - I was expecting something a little more dense, so that was a happy realization.

Sunday, January 29, 2012

Chewy Pretzel Bites

Source: Mel's Kitchen Cafe


Ingredients:
Dough:
2 1/2 cups (10 1/2 ounces) all-purpose flour
1/2 teaspoon salt
1 teaspoon sugar
2 1/4 teaspoons instant yeast
*Note: if using active dry yeast, increase the yeast to 1 tablespoon. Proof the yeast in the warm water and sugar (let it bubble and foam – maybe about 5 minutes) before adding it to the flour and salt.
1 cup (8 ounces) very warm water

Topping:
1/2 cup (4 ounces) warm water
2 tablespoons baking soda
Coarse salt (optional)
3 tablespoons butter, melted

Directions:
In a large bowl or the bowl of an electric mixer, place the flour, salt, sugar and yeast. Mix to just combine. Add the water and mix well, adding more flour, as needed, a bit at a time to form a soft, smooth dough that clears the sides and bottom of the bowl. Knead the dough, by hand or machine, for about 5 minutes, until it is soft, smooth and quite slack. The goal is to get a really soft dough that isn’t overly sticky. Lightly flour the dough and place it in a plastic bag (if / when I ever make these again I will NOT do the bag thing - it made a huge, sticky mess - instead, I'll just cover my dough with a towel and leave it in the bowl to rise, like I do for all my yeast dough making); close the bag, leaving room for the dough to expand, and let it rest for 30 minutes or up to 60 minutes.

Preheat your oven to 500°F. Don’t be afraid of the high heat! This is what will help those pretzels to brown up perfectly and stay soft on the inside. Prepare two baking sheets by lining them with parchment paper or lightly greasing them.

Transfer the dough to a lightly greased work surface, and divide it into about four strips of equal length. Allow the pieces to rest, uncovered, for 5 minutes. While the dough is resting, combine the 1/2 cup warm water and the baking soda in a liquid measuring cup (deep enough to dip the pretzel bites into). Make sure the baking soda is thoroughly dissolved. (My soda was never fully dissolved, so I just stirred it right before dunking each of my dough pieces.)

Cut each strip of dough into about 6-8 pieces, about 1 to 1 ½ inches in width. You don’t have to be completely exact, just eyeball it. Dip each pretzel bite in the baking soda solution (this will give the pretzels a nice, golden-brown color), and place them on the baking sheets.  (I think I'd somehow like to drain them a bit before baking next time - they had a rather strong baking soda taste upon the first bite and I think it's because some of my soda water pooled up around each dough blob.) Sprinkle them lightly with coarse, kosher, or pretzel salt. Allow them to rest, uncovered, for 10 minutes.

Bake the pretzels for 7-8 minutes or until they’re golden brown. Bake one sheet at a time – it won’t hurt the other pretzels to chill out for a little longer.

Remove the pretzels from the oven, and brush them thoroughly with the melted butter. Keep brushing the butter on until you’ve used it all up; it may seem like a lot, but that’s what gives these pretzels their ethereal (Mel's word, not mine - but it's true that they were!) taste. Eat the pretzels warm, or reheat them in an oven or microwave on low heat.

Also - check out Mel's blog for some great step-by-step photo instructions.

Makes about 2 dozen pretzel bites.

Notes:
While reading some of the comments about Mel's split pea soup, which I had already decided to make, I read that someone had made it with these pretzel bites as a side.  That intrigued me and I thought I'd give it a shot.  Um.  Yum.  A little different than your usual bread or rolls with soup, but definitely delicious.  And they'd make a great after school or football-watching snack, too.

Split Pea Soup with Barley and Ham

Source: Mel of Mel's Kitchen Cafe

Ingredients:
1 cup dry split green peas
1/2 cup medium pearl barley (not quick-cooking barley)
2 cups chopped ham
3/4 cup chopped carrots
3/4 cup chopped yellow onion
3/4 cup chopped celery
5 cups water
2 chicken bouillon cubes (or 2 teaspoons chicken bouillon granules)
1 teaspoon garlic powder
1/2 teaspoon salt
1/2 teaspoon black pepper
1 bay leaf

Directions:
In a medium bowl or liquid measure, combine the water, bouillon cubes and spices and whisk to combine (it’s ok if the bouillon cubes don’t completely dissolve).

In a medium round slow cooker (about 4-quart), layer peas, barley, ham, carrots, onion and celery. Do not mix. Pour in the water/spices mixture and add the bay leaf to the slow cooker. Don’t stir! Cover the slow cooker and cook on high for four hours or on low eight hours, until the peas reach the desired creamy, soft texture. Remove the bay leaf, stir well, and add salt and pepper to taste, if needed. Serve immediately. Upon sitting and/or refrigerating, this soup thickens considerably. Simply add water or chicken broth to thin the soup to the desired consistency before reserving.

Notes:
I never grew up with split pea soup (it's one of the only things I've ever heard my mom say she hated - stemmed from a stay in the hospital as a child, I think).  (In fact, the only thing I had ever done with split peas was to extract DNA from them.)  But I know Gregg likes it, and after Victoria's comments about loving barley, I thought it was as good a time as ever to give it a whirl.  All I can say is Yum!  (With a capital Y.)  This is really yummy - and probably not too much different than the other split pea soup recipes posted already, but the barley really is a nice addition, I think.  I only halved the recipe when I made it because I wasn't sure how much I would love it, but next time I'll make the whole thing.  (The half recipe was probably 3 generous servings or 4 smaller ones.)

Sunday, January 22, 2012

Easy Coconut Sheet Cake

Source: Tastykitchen.com, via Pinterest


Ingredients:

For the cake:
1 box (18.25 oz. box) white cake mix
1 package (3.4 oz. size) vanilla pudding mix
¼ cups canola oil
½ cups water
1 cup sour cream
4 eggs
1 teaspoon coconut extract (my addition)
1 cup shredded coconut

For the glaze:
¾ cups powdered sugar
¼ cups butter
2 ounces, weight cream cheese
1 Tablespoon lemon juice
1 Tablespoon milk (I used coconut milk, since I happened to have it on hand)

For the frosting:
8 ounces, weight cream cheese
¼ cups butter
4 cups powdered sugar
1 teaspoon vanilla extract
½ teaspoon coconut extract (again, I added this to give the frosting more coconut flavor)
1 cup shredded coconut
½ cups toasted coconut, for garnish (I made mine by slowly toasting it on the stove over low heat)

Directions:


  1. Preheat oven to 350ºF. Grease and flour a 13″ x 9″ baking dish. In a large mixing bowl, blend together cake mix, vanilla pudding, canola oil, water, sour cream, and eggs. Blend on medium speed for 3 minutes. Add the coconut and mix well. Pour into the greased pan and bake for 30 to 35 minutes or until lightly brown and a toothpick inserted into the center comes out clean.

  2. For the glaze, cream together the powdered sugar, butter, and cream cheese. Add lemon juice and milk and blend until smooth. Poke small holes in the cake with a knife or toothpick. Pour the glaze over the warm cake. After the glaze has soaked into the cake for a few minutes, place the cake in the fridge and allow to cool completely.

  3. For the frosting, cream together the cream cheese, butter, powdered sugar, and vanilla until smooth. Add shredded (untoasted) coconut and mix well. Gently spread over the cooled cake. Don’t worry if some of the glaze mixes with the frosting while you are spreading it on—it will be delicious! Sprinkle toasted coconut on top.

  4. Store the cake in the fridge to keep it fresh and yummy.


Comments:

This cake was incredible! I made it for Scott's mom's birthday a couple weeks ago -- coconut cake is her favorite -- and it turned out so yummy! Really dense and moist; plus, the glaze and frosting added even more moistness and incredible flavor. As I mentioned, I added coconut extract and coconut milk in the different components of the cake to give it even more of a "coconutty" flavor. This cake is definitely going to go into our dessert rotation!

Mississippi Mud Brownies

Source: Tasty Kitchen

Not the best photo ever - but they didn't last long!
Ingredients:
for the brownies:
¾ cup all-purpose flour
2 Tablespoons unsweetened cocoa powder
½ teaspoon salt
½ cup unsalted butter, at room temperature
1 cup white sugar
¾ teaspoon pure vanilla extract
2 whole large eggs
¾ cup semi-sweet chocolate chips
½ cup crunchy peanut butter (we had creamy open, so creamy was used)
1-½ teaspoons canola oil
2 cups mini marshmallows (we had big ones that I cut into fourths)
½ cup chopped and toasted pecans (I was afraid of toasting nuts because I was worried about burning them - it's really not scary - just spray a cookie sheet with non-stick cooking spray and toast the nuts at 350F for 5 minutes or until they become aromatic - got that tip from food.com)

for the icing:
2 cups confectioner's sugar
⅛ teaspoons salt (don't be like me and misread this as 1/2 teaspoon - that is way too much salt!)
4 Tablespoons unsalted butter
2 Tablespoons unsweetened cocoa powder
¼ cup + 2 Tablespoons milk
¼ teaspoon pure vanilla extract

Directions:
Preheat oven to 350 degrees F. Line an 8×8″ square baking pan with parchment paper or foil. If using foil, spray it with cooking spray.  (I just greased my pan really well and they came out easily.)

In medium bowl, combine flour, 2 Tablespoons cocoa powder, and 1/2 teaspoon salt. Set aside.  In large mixing bowl, beat together 1/2 cup butter, sugar, and 3/4 teaspoons vanilla until creamy. Add the eggs one at a time. Stir dry ingredients into batter. Pour batter into prepared pan and spread evenly. Sprinkle with chocolate chips. Bake in preheated oven for 22-25 minutes.

When brownie layer is done baking, combine peanut butter and oil in a microwave safe bowl or measuring cup and microwave on high for 20 seconds to soften. Pour this warm mixture over hot brownie and spread.

Sprinkle the peanut butter covered brownies with marshmallows. Return to oven to bake for 3 more minutes, or until the marshmallows puff. Remove from oven and sprinkle puffed marshmallows with toasted pecans.

To make frosting, combine confectioner's sugar and salt. In small saucepan, melt 4 Tablespoons butter over medium heat. When butter is melted, add the 2 Tablespoons of cocoa powder and 1/4 cup of the milk and heat until the mixture begins to boil. Pour this mixture into confectioners sugar/salt mixture and beat on high speed with an electric mixer until smooth and glossy. If frosting is not pourable at this point, add remaining 2 Tablespoons of milk. Lastly, beat in 1/4 teaspoon vanilla, then pour evenly over puffed marshmallows and pecans.

Let cool completely in refrigerator for 1-2 hours. Cut into squares and enjoy!

Notes:
Enjoy we did!  I saw this recipe pop up on the Tasty Kitchen Blog while visiting my family in Logan last week.  My sister came home from work/school that day and starting describing this awesome brownie recipe she had seen online that morning.  It was the same recipe.  This one.  My mom was kind enough to let me take over her kitchen and her ingredients for the morning while I whipped these up.  (I told her I probably would never make them at my apartment because I don't have all those ingredients on hand - she did, which made things really easy.)  They are super rich, so a little bite goes a long way.  But they really are quite heavenly.  Just remember 1/8 teaspoon salt in the frosting - NOT 1/2 - and you should be fine.  :)

Tuesday, January 17, 2012

Yummy Spaghetti

Source: adapted from a recipe by my aunt, Nikie Elwood

Ingredients:
1 lb ground beef or 1 lb cooked chicken (diced or shredded)
1/2 onion, chopped
1/2 green pepper, chopped
2 cloves garlic, minced
1 can cream o' mushroom soup
1 bottle spaghetti sauce
1/4 cup parmesan cheese
1 cup shredded cheese (I used mozzarella but cheddar is good, too)
a bunch of spaghetti or angel hair pasta (I never know how to really measure spaghetti - so just cook enough to fill a 9 x 13" casserole dish.)

Directions:
Boil your pasta according to package directions.  Drain and put in a 9 x 13" casserole dish.

In a saucepan, brown ground beef and add onion, green pepper and garlic (if using chicken instead, just saute the veggies in a little bit of oil and then add the chicken when they are soft).  Add soup, sauce and parmesan cheese and simmer together.

Pour sauce mixture over pasta and carefully mix so all noodles are coated.  Sprinkle with grated cheese and bake at 350F for about 30 minutes, or until warmed through and cheese on top is bubbly.

Notes:
I remember when one of my little sisters (probably Megan) was born that Nikie brought our family a pan of this "yummy spaghetti" and I loved it.  When I was racking my brain for ideas on what to feed the missionaries last night, this seemed to fit the bill because a) I had everything we needed and b) it can feed a crowd - or a couple of hungry elders.  So the decision was made.  And it was good.  And we still have some leftover for today.  Score.

Creamy Cajun Chicken Pasta

Source: here, via here, via pinterest


Ingredients:
2 boneless skinless chicken breasts, cut into thin strips
4 ounces linguine, cooked al dente (I used whole wheat linguine)
2 teaspoons cajun seasoning
2 tablespoons butter
1 thinly sliced green onion
1-2 cup heavy whipping cream (I used half 1% milk and half whipping cream)
2 tablespoons chopped sun-dried tomatoes
1/4 teaspoon salt
1/4 teaspoon dried basil
1/8 teaspoon ground black pepper
1/8 teaspoon garlic powder (I used fresh minced garlic)
1/4 cup grated parmesan cheese

Directions:
Place chicken and Cajun seasoning in a bowl and toss to coat. In a large skillet over medium heat, sauté chicken in butter or margarine until chicken is tender, about 5 to 7 minutes. Reduce heat add green onion, heavy cream, tomatoes, basil, salt, garlic powder, black pepper and heat through. Pour over hot linguine and toss with Parmesan cheese.


Notes:
Bret and I had a rough weekend, so last night we needed some, hearty, bad-for-you, take-your-mind-off-your-troubles comfort food, and oh boy did this do the trick! Spicy yet creamy, it was soothing and traditional yet exotic enough to bring a little pep into the evening. A few changes that I made were to replace the cajun seasoning with creole, replace the green onion with about 1/2 of a large yellow onion, use milk instead of the cream (plus a tablespoon or two of flour to thicken), and add some extra creole seasoning at the end for a little extra spice. 

Monday, January 16, 2012

Rice Cooker Teriyaki Chicken and Rice

Source: this site, via Pinterest

Ingredients:
chicken (I used a boneless chicken breast, cut into 1-inch pieces, seasoned with salt and pepper, and browned in a little bit of oil directly in my rice cooker - but you can use whatever you like and/or have on hand)
2 cups rice (or enough for your family - we used 2 cups and that lasts for dinner plus a few lunches for the next couple of days)
1/4 cup brown sugar
1/4 cup soy sauce
3 Tablespoons ketchup
1/4 cup water + 3 cups water

Directions:
In a bowl, mix brown sugar, soy sauce, water and ketchup.  Stir until well blended.  Set aside.  Measure out enough rice to feed your family.  Pour it into a rice cooker.  If you don't have a rice cooker, you can still do this on the stove, it just takes a little more watchful eye.  Measure out the correct amount of liquid for your rice (the teriyaki sauce recipe above makes about 1 cup liquid, so I added 3 cups water to make 4 cups total liquid for my rice to cook).  If you want a stronger teriyaki flavor simply increase the amount of sauce you prepare and decrease the extra water accordingly.  Pour the teriyaki sauce in the rice cooker.  Add the extra water.  Dice the chicken and dump it in the cooker as well.  Set the cooker to cook and walk away.  (I also added frozen peas to the mix, though I think I'd like them better if I just stirred them in towards the end rather then letting them cook the whole time.)

Notes:
Just another quick little recipe I found on Pinterest.  Pretty tasty, though our rice was a little bit chewy, so next time I'll probably add a bit more water.  Love that rice cooker - makes dinner time a breeze!

Thursday, January 12, 2012

Banana Bread

Source: adapted from The Essential Mormon Cookbook


Ingredients:
3 ripe bananas
1/2 cup brown sugar
1/2 cup white sugar
1/2 cup butter, at room temperature
2 eggs, well beaten
1 cup all purpose flour
1 cup whole wheat flour
2 Tablespoons ground flaxseed meal
1 teaspoon baking soda
1/2 teaspoon salt
1/2 cup walnuts or chocolate chips (or both!)

Directions:
Mash bananas and set aside.  In a large bowl cream sugar and butter together.  Stir in eggs and mashed bananas.  In a separate bowl sift together flour, baking soda, flaxseed meal and salt.  Add to first mixture and stir together.  Stir in nuts and/or chocolate chips.  Place in two greased, 9x5-inch loaf pans and bake at 350F for 25 minutes.  Reduce heat to 275F and bake for an additional 20 to 25 (it only took mine about 10!) minutes or until toothpick comes out clean.  Makes 2 loaves.

Notes:
You know the drill - you buy a bunch of bananas, and eat two or three of them, but there's always a straggler or two that turn too brown for regular eating.  What else is left to do than make some delicious baked good out of them?  That was my situation yesterday.  And since my sister Megan wasn't around to make it for me, I turned to my trusty Mormon Cookbook and whipped up a batch of bread myself.  I admit I did tweak the recipe a titch - I split the sugar into white and brown and did the same for the flour, plus I took the liberty to add in some flax and chocolate (because I didn't have walnuts and would have definitely loved to use them if I did).  I think the finished product turned out quite nice.  And the heavenly aroma while it was baking?  Oh my!

Tuesday, January 10, 2012

Cilantro Lime Chicken (Slow Cooker)


Source (via pinterest)


Directions:
1. In a slow cooker (crockpot), mix together
1 24-ounce jar mild or medium salsa
Juice from one lime
1-4 cup fresh cilantro, chopped
1 package taco seasoning
1 jalapeno pepper, finely chopped (optional)

2. Add 4-6 boneless chicken breast halves (defrosted) and coat with the salsa mixture.

3. Cover and cook on low for 6 hours.

4. Serve the chicken with the salsa mixture spooned over the top, as a taco filling, or as a layer of taco salad.

Notes: We used this chicken, shredded, in burritos last night - yum! Bret and Melia noticed a lot of spicy heat (I only used mild salsa and 1/2 of a jalapeno), but I didn't taste any. Either way, it was very flavorful, super delicious, and outrageously easy!

Monday, January 9, 2012

Zucchini Rice Casserole


Source (via pinterest)

Ingredients:
1 1/2 cups long-grain brown rice
3 cups reduced-sodium chicken broth
4 cups diced zucchini and/or summer squash
2 red or green bell peppers, chopped
1 large onion, diced
3/4 teaspoon salt
1 1/2 cups low-fat milk
3 tablespoons all-purpose flour
2 cups shredded pepper jack cheese, divided
1 cup fresh or frozen corn kernels
2 teaspoons extra-virgin olive oil
8 ounces turkey sausage, casings removed
4 ounces reduced-fat cream cheese
1/4 cup chopped pickled jalapenos (I used fresh jalapenos, finely diced)

Directions:
1. Preheat oven to 375 degrees F
2. Pour rice into a 9x13 inch baking dish. Bring broth to a simmer in a small saucepan. Stir hot broth into the rice along with zucchini, bell peppers, onion, and salt. Cover with foil. Bake for 45 minutes. Remove foil and continue baking until the rice is tender and most of the liquid is absorbed, 35 to 45 minutes more.
3. Meanwhile, whisk milk and flour in a small saucepan. Cook over medium heat until bubbling and thickened, 3-4 minutes. Reduce heat to low. Add 1 1/2 cups jack cheese and corn and cook, stirring until the cheese is melted. Set aside.
4. Heat oil in a large skillet over medium heat and add sausage. Cook, stirring and breaking the sausage into small pieces with a spoon, until lightly browned and no longer pink.
5. When the rice is done, stir in the sausage and cheese sauce. Sprinkle the remaining 1/2 cup jack sheese on top and dollop cream cheese by the teaspoonful over the casserole. Top with jalapenos.
6. Return the casserole to the oven and bake until the cheese is melted, about 10 minutes. Let stand for about 10 minutes before serving.

Notes: With the warmer weather, we've been eating a lot of light, low-calorie meals, but when the snow hit, I was ready for some good old-fashioned comfort food. This was perfect because while it tastes naughty, it's not as guilt-worthy as it seems. I've added a few notes to the recipe to remember next time"
- eliminate the cream cheese dollops on top. They were delicious, but really just unnecessary calories. Plus, they didn't melt like I expected, just remained firm chunks.
- The overall cook time was much less than expected because I didn't have to bake the rice/vegetables again to reduce the liquid like in the directions - when I took the foil off after the first 45 minutes, my rice was tender and the broth was all absorbed. So, start cooking the milk/cheese sauce and sausage about 15 minutes before timer beeps.
- Cook the sausage first and the milk/cheese sauce second. The sauce with thicken as it cools and it needs to be warm and pourable when you add it to the rice/vegetables.
- If you're feeding meat lovers, double the sausage (use 1 lb)

Saturday, January 7, 2012

Vanilla Dutch Baby (Puffed Pancake)

Source: A combination of recipes from the trusty ol' BHG cookbook and The Food Network


Ingredients:

  • 2 T. butter

  • 3 eggs

  • 1/2 c. flour

  • 1/2 c. milk

  • 1/4 t. salt

  • 1 T. sugar

  • 2 t. vanilla extract

Directions:


  1. Place butter in a 10-inch ovenproof skillet. (I doubled the recipe and put it in a large, glass cake pan.) Place butter in a 400-degree oven for 3-5 minutes or until butter melts.

  2. In a medium mixing bowl, beat eggs until combined. Add flour, milk, salt, sugar, and vanilla. Beat until mixture is smooth.

  3. Immediately poor mixture into the hot skillet. Bake about 25 minutes or until puffed and well-browned.

  4. Top with whipped cream, syrup, fruit, powdered sugar, etc. Cut into wedges and serve warm.

Comments: I've made puffed pancakes/German pancakes/Dutch babies before, but I saw a sweet version on The Food Network this week and decided to try adding sugar and vanilla to the regular recipe. So yummy, they didn't even need toppings!

As I mentioned, I doubled the recipe and baked it in a regular cake pan (so we'd have plenty!). The boys loved seeing the huge, inflated pancake come out of the oven. . .a fun change from our usual wheat pancakes.

Friday, January 6, 2012

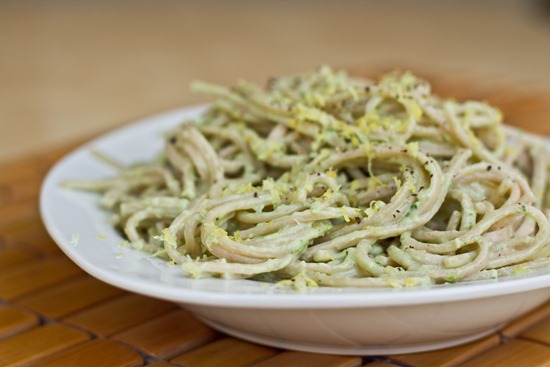
Creamy Avocado Pasta

IMG_0191
Source (via pinterest)

Ingredients:
1 medium, ripe avocado (pitted)
1/2 lemon, juiced, plus lemon zest to garnish
2-3 garlic cloves, to taste
1/2 tsp kosher salt, or to taste
1/4 cup fresh basil
1 Tbsp extra virgin olive oil
2 servings (6 oz) of your choice pasta (I used whole grain angel hair)
Ground black pepper, to taste

Directions:
1. Cook pasta according to package instructions.
2. Meanwhile, make the sauce by blending the garlic, lemon juice, and olive oil in a blender or small food processor until smooth. Add the avocado, basil, and salt. Process until smooth and creamy.
3. When pasta is done cooking, drain and place in a large bowl. Pour on sauce and toss until fully combined. Garnish with lemon zest and black pepper. Serve immediately. Makes 2 servings.

Notes: Holy moly. This is delicious! I had some leftover avocados from making my favorite guacamole last night, which gave me an excuse to try this recipe that I've had pinned forever. It was so easy and oh so delicious! The flavor could be described as "avocado pesto." I'm not even the biggest fan of avocados, so if you're partial to the vegetable, then prepare yourself for some serious joy!

Philly Cheeseteak Sloppy Joes

Source: this site, via Pinterest

Ingredients:
1 Tablespoon olive oil (skipped it)
1 pound ground beef
1 softball-sized onion, chopped
1 green pepper, chopped
2 tablespoons steak sauce (didn't have any, so added 1 Tablespoon Worcestershire sauce + 1 Tablespoon ketchup)
1 cup beef stock
Salt and ground black pepper
8 hamburger buns (the smaller ones)
1 tablespoon butter
1 tablespoon flour
1 cup milk
1 cup provolone, shredded (only had mozzarella, which was really kind of bland by itself, so I added a squirt of horseradish sauce and a squirt of mustard to sass it up a bit)

Directions:
In large skillet over medium-high heat add the oil and then brown the ground beef, about 5-6 minutes. Add the onion and green pepper and cook another 3-4 minutes, until the vegetables start to get tender. Stir in the steak sauce and beef stock, season with salt and pepper, bring up to a bubble and cook about 2 minutes.  (I found that two minutes wasn't quite long enough - it was really soupy stuff, so I let it simmer and bubble for a while longer to let a lot of the moisture evaporate.)

If you like toasted buns, go ahead and do that now.  If not, move on to the next step.

While the meat is cooking, melt the butter in a medium-size pot over medium-high heat. Stir in the flour and cook about 1 minute. Whisk in milk, bring up to a bubble and let thicken, about 2 minutes. Turn off heat and stir the cheese.

To serve, place a scoopful of the meat mixture onto the bottom of the rolls, then top with the cheese sauce and replace the top of the roll.

Notes:
Just another of those random recipes I've discovered due to the wonderful world of Pinterest.  This one looked fun, quick and different, so I gave it a go.  I definitely would recommend something a little more flavorful than mozza for the cheese, but other than that I was quite pleased with this recipe.

Tamale Pie

Source: Kim G. Blanchard, via The Blanchard Bistro Cookbook (but I didn't see it on the blog, so I'm posting it here)

Directions:
Brown and drain:
1 lb ground beef
1 onion, chopped
1/4 cup green pepper, chopped
Season with garlic, salt and pepper to taste.

Add:
1 large can stewed tomatoes
1 can corn
1 can diced green chiles
1 can whole medium olives, drained (I left these out and substituted for 1 can black beans, rinsed and drained)
1 can tomato sauce
chili powder, cumin - to taste (I added 1 teaspoon of each)

For the crust:
Mix in a large saucepan, cook on stovetop till thick (do not cool, spread hot over filling immediately after making):
4 cups cold water
2 1/2 cups cornmeal
1 teaspoon salt
1 teaspoon chili powder

Pour filling in casserole dish.  Sprinkle with 2 cups grated cheese.  Spread crust over filling.  Bake at 350F till crust is done and brown (about 35 - 40 minutes - I found that we needed even more time than that - closer to 50).

Notes:
I was perusing the internet one morning and stumbled across a recipe on Mel's Kitchen Cafe called Cowboy Dinner.  When I gave Gregg a couple options for dinner that night (I just couldn't decide), I included a link to Mel's recipe (we were chatting over gmail) and that sparked a memory of his mom's similar recipe - this recipe for Tamale Pie.  I pulled out the binder that Kim gave me at my bridal shower and low and behold they were pretty similar.  I decided to try Kim's version because the crust intrigued me.  Oh boy am I glad I did.  I loved it and I ate the leftovers for days afterward.  (I think it got better with age!)  I love cornbread, but this crust definitely isn't bready - it's more like a tamale, as the name says.  Yummy stuff here.

Cheese 'n' Sausage Calzones

Source: My mom's recipe box

Ingredients:
15 ounces Ricotta or cottage cheese
2 cups shredded mozzarella cheese (1 lb.)
½ cup grated Parmesan cheese
1 teaspoon dried oregano
1 teaspoon dried basil
½ cup finely chopped onion
½ cup finely chopped green pepper
1 garlic clove, minced
1 teaspoon cooking oil
1 pound bulk Italian sausage
5 1-pound loaves frozen bread dough, thawed  (I decided to try a homemade version and used Mel's French Bread Roll dough - the same stuff I made the braid from a few weeks ago) (Update Dec 2017: I always use my usual pizza dough recipe and bake at 400 for about 23 minutes nowadays.)
1/4 cup butter or margarine, melted
1 16 ounce jar spaghetti sauce, heated

Directions:
In a small bowl, combine cheeses, oregano and basil.  In a large skillet, saute onion, green pepper and garlic in oil until tender.  Add to cheese mixture.  In the same skillet, brown sausage; drain and stir into cheese mixture.  Divide each loaf of dough into halves; divide each section in half and roll each portion into a circle. (If you're making the homemade dough, just pinch off clumps - one batch should make about 12 or so - and flatten them in your hand or roll them into small circles - about 5-6 inches in diameter.)  Spoon 2 tablespoonfuls of filling on half of each circle.  Fold the other half over and wet the edges.  Seal with a fork or with fingertips.  Place on greased baking sheets and bake at 350° for 25 minutes or until golden brown.  Serve with spaghetti sauce for dipping.  Serves 20 (freeze leftovers for lunch).  Optional fillings: mushrooms, olives, scrambled eggs, spinach, etc.

Notes:
This is a yummy and filling meal.  It does take a little time to assemble all the calzones, but in the end it's more than worth it.  And this recipe makes a TON.  We halved it for just Gregg and me, and even that fed us for breakfast, lunch and dinner for days.  Also, don't be afraid of the goop - it will most likely ooze out of your dough as it's cooking,  no matter how careful you are - just scoop it up and plop it on top!  (I don't worry a lot about presentation at my house, can you tell?)

Grandma's Gingerbread House Dough

Source: My Grandma, Margaret Elwood

Just one of many, many, many houses that have been
created using this recipe.
Ingredients:
2 3/4 cups flour
1/2 teaspoon salt
1 teaspoon ginger
2/3 cup molasses
1 egg
3 teaspoons baking powder
1 teaspoon cinnamon
1/8 teaspoon cloves
1/3 cup brown sugar
1/2 cup vegetable oil

Directions:
Use electric mixer to mix all ingredients together.  Use hands to then compact dough into a ball.  Put dough in a zip lock bag or wrap in plastic wrap and refrigerate overnight.  Place dough on a greased jelly roll pan and roll out to evenly fill pan.  Place gingerbread house pattern (I'm working on getting this!) on dough and lightly mark outline.  Bake at 300 degrees F for about 30 to 35 minutes.  Remove from oven and use marks to completely cut out shapes (this must be done before the dough cools and hardens).  After cutting, remove pieces from pan and cool on a wire rack.  Once cool, the pieces should be very hard.  If not, place on a cookie sheet and return to oven for 5-10 minutes longer.  Pieces can then be assembled using icing or hot glue (I think that hot glue was added by my uncle, Bryan - the cheater!  ;)  We have found that using meringue powder works wonders for making a really stiff, hard setting royal icing that holds those houses firm . . . though there were years in the early days when there were a few tears shed because of a sinking roof and I really would have loved to use glue!)

Notes:
This is one of those traditions that has been going on and on for as long as I can remember.  I've never missed a year of the gingerbread house making extravaganza at Grandma's house (usually takes place Thanksgiving weekend, but not always) till this year.  Luckily, my mom whipped up a batch for me and Gregg to take home with us after our trip to Utah for the wedding.  She even included a little baggie of meringue powder and directions for making the royal icing.  Then we just scrounged around our apartment for "decorations"* and voila!  A masterpiece.  (*My grandma has been doing this for so many years that she has a big bin of candy that we just keep reusing - think old, hard, stale stuff - replenishing just a few things each year as needed . . . this worked fine till Gregg came along because we never ate our gingerbread houses before - he had a different idea about things, and as it turns out, the houses are pretty dang good to nibble on, too!)

Wednesday, January 4, 2012

PB & J Muffins

Source: here, via Pinterest


Ingredients:
1 1/4 cup white whole wheat flour (I used 1 cup white + 1/4 cup whole wheat)
1/2 cup vanilla sugar (don't know what this is - so I just used regular sugar)
1 Tablespoon baking powder
1/2 teaspoon fine sea salt (regular salt for me)
1/4 cup unsalted butter
1/2 cup creamy peanut butter
2 large eggs
2/3 cup whole milk (we have 1%)
1/4 cup jam (whatever you like - I did some with homemade jumbleberry and some with store-bought strawberry)
1 teaspoon vanilla (I added this because my sugar was not "vanilla sugar")

Directions:
Preheat the oven to 400 degrees Fahrenheit. Grease or line a 12-cup muffin tin with paper liners and set aside.  In a large bowl, combine flour, sugar, baking powder, and salt.

In another microwave safe bowl, melt the butter and peanut butter. Lightly beat in the milk until creamy, then the eggs, one at a time.  Pour into the dry ingredients and the stir until there are no dry spots.

Using a cookie scoop (I used a rounded 1 Tablespoon), fill each muffin cup halfway. Make a well, add about a teaspoon of jam, and scoop the remaining batter over the top.

Bake for 20 minutes, or until the tops are golden.  Let sit in muffin tin for 10 minutes, then transfer to wire cooling rack to cool completely.

Notes:
Yep, another muffin recipe from Kimma.  I admit I have a problem.  But really, these were so yummy!  Especially when they were still a little bit warm from the oven with a mug of cold milk.